Category Archives: Vegetarian

Vegan Raspberry “Buttermilk” Cake

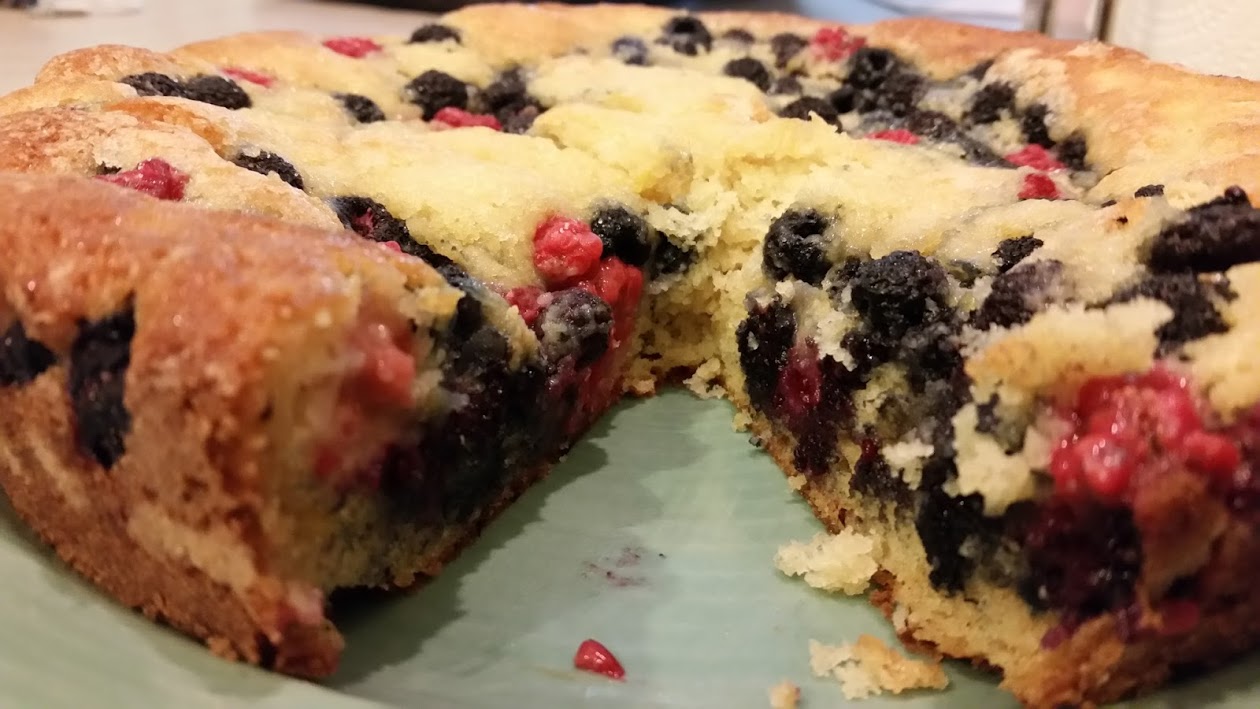
It’s mildly embarrassing to me that the raspberry bush that the “birds planted” in my yard does better than the one that I water and actually care for regularly. No matter, the birds dropped it in the perfect spot, my old garden box, so I get to benefit from their ingenuity I suppose in some form. The raspberries that humans planted were sparse, but large, red and delicious while the raspberries that the birds left us are small, black and a little more tart so I looked for a recipe where I could combine them to get the best of both worlds and I found it, in a cake on one of my fave websites The Smitten Kitchen. I veganized it and was good to go with what is now one of my favorite recipes for any berry. This recipe makes one thin 9-inch cake.

macro shot of raspberry cake from side angle

1 cup (130 grams) all-purpose flour
1/2 teaspoon (2 grams) baking powder
1/2 teaspoon (2 grams) baking soda
1/4 teaspoon salt
1/2 stick (56 grams) unsalted butter substitute, softened ( I used Earth Balance )
2/3 cup (146 grams) plus 1 1/2 tablespoons (22 grams) sugar, divided ( make sure it’s a vegan brand )
1/2 teaspoon pure vanilla extract
1/2 teaspoon finely grated lemon zest ( it’s optional but man does it take this to a new level of yum )
1 large (57 grams) vegan egg of choice, I used a flax egg
1/2 cup (118 ml) well-shaken buttermilk ( to make vegan buttermilk, I took 1T of white vinegar – you could also use lemon juice for this – and added it to 1/2C unsweetened Califia almond milk, let it set for a few minutes and then beat the crap out of it with a whisk – very technical, I know)
1 cup (5 ounces or 140 grams) fresh raspberries, I used a mix of red and black

Preheat oven to 400°F with rack in middle. “Butter” and flour a 9-inch round cake pan.

Whisk together flour, baking powder, baking soda, and salt and set aside. In a larger bowl, beat vegan butter and 2/3 cup (146 grams) sugar with an electric mixer at medium-high speed until pale and fluffy, then beat in vanilla and zest, if using. Add egg and beat well.

At low speed, mix in flour mixture in three batches, alternating with vegan buttermilk, beginning and ending with flour, and mixing until just combined. Spoon batter into cake pan, smoothing top. Be careful, make sure the middle is not more dense than the sides here or you will have a dry outside and too moist of a middle. Scatter raspberries evenly over top and sprinkle with remaining 1 1/2 tablespoons (22 grams) sugar.

Bake until cake is golden and a wooden pick inserted into center comes out clean, 20 to 25 minutes. Cool in pan 10 minutes, then turn out onto a rack and cool to warm, 10 to 15 minutes more. Invert onto a plate.

Raspberry Cake 2

Adapted from Gourmet, June 2009 and veganized from Smitten Kitchen


Raw, Vegan Peanut Butter Cookies with Sea Salt

You know by now my love affair with Pinterest. This recipe has been pinned for a bit on my Eat board and was long past time to try it. I dare say, you should go check out A House in The Hills blog where this post originated, blogger Sarah has lots of interesting things going on over there.

We have a bit of a peanut butter problem in our home, this hits the spot and is fairly healthy. Also, it doesn’t require you to turn on the oven and in the summer that’s critical in our home. Get your peanut butter cookie fix here:

  • 1 cup of raw almonds – I had 3/4 cup raw almonds in the pantry and supplemented them with 1/4 raw cashews
  • 1/2 cup of peanut butter – I used unsalted, chunky here
  • 1 cup pitted Medjool dates
  • 1 1/4 teaspoons of vanilla extract
  • sea salt to garnish

This slideshow requires JavaScript.

Combine raw nuts, peanut butter, dates and vanilla in your food processor or high power blender until a doughy texture comes together. Sarah recommend that you add more peanut butter if the dough is not sticking together properly. Remember you aren’t baking these babies, so it’s super important that they stick together! After you get the consistency you are striving for form into small balls and use a fork to create the traditional criss-cross mark on top of a baked cookie. Sprinkle with sea salt if you like. Although, I can see where a few chocolate chips might not be such a bad idea here either!

Store these in your fridge or freezer well packaged. Sarah from A House in the Hills says they are better the next day, but I am not sure mine have a shelf life of “the next day.”

Marinated Asian Tofu

I have a pantry full of delish Asian ingredients which I use to make varied marinades, dressings, etc. You would be shocked how great chickpea miso, oil, vinegar and some Sriracha sauce are as a salad dressing in a pinch. The ingredients are flexible, tasty and many of them vegan. This weekend we got together with Chef Dewicki and Andrea which means amazing food shall be had and this time was no exception. I opted to use all ingredients from my house, meaning no trips to the grocery store which challenges me in a very, very good way. Taking a cue from a recipe I’ve been eyeballing over on Pinterest, here is a marinated tofu recipe that I dropped atop peanut noodles and then added grilled veggies and roasted Urban Mushroom CSA goodies from their last delivery for a quick pasta salad.

This slideshow requires JavaScript.

Marinade:

  • 1 tsp Ume plum vinegar
  • 3-4 T low sodium soy sauce
  • 1 tsp rice wine
  • 1 glug maple syrup, use agave or other favored sweetener here if you want
  • 1 T nonflavored oil, I used canola
  • 1 T chopped garlic
  • 1/2 tsp powdered ginger
  • 1 tsp roasted sesame oil
  • 1 1/2 tsp Sriracha
  • 1 tsp water

Whisk all ingredients together in a medium bowl. Drop in your pieces of tofu or tempeh, let soak for about 20 minutes, turning once at 10 minutes to cover all pieces. As I was roasting mushrooms anyway, I put the tofu pieces on a foil-covered roasting pan in the oven with the excess sauce at 375 for about 40 minutes. You want it firm and cooked, all marinade soaked up, but not dry. So keep an eye on it. I cut up my barely pressed tofu into matchsticks so they roasted pretty quickly. This method yields pretty concentrated flavor in the tofu, so go easy on the seasonings of the salad, wrap, pita or pasta you drop it on as you don’t want to make a salty mistake.

**Roasted mushroom images here to make you a little jealous. Although they would taste super yummy in the marinade too.

Vegan Sriracha Maple Glazed Veggies

This slideshow requires JavaScript.

I totally missed the boat on posting Thanksgiving recipes this year-don’t judge me. Luckily this recipe isn’t just a “holiday” recipe so I can share with you now. It will warm you up from the inside out AND it’s a sneaky way to make veggies that sometimes get a bad rap, like brussels sprouts, into the belly of an unsuspecting friend with favorable results. I think this could be slathered on just about anything but for this recipe I chose sweet potatoes, raw cranberries (go with it okay), and brussels sprouts – I think any roasted veggie would do though, so experiment with whatever is in your pantry already.

  • 1/2 C maple syrup
  • 3T EVOO (about 1T per cup of veggies roasting)
  • 3T Sriracha
  • 1 1/2 T Braggs Aminos (or low sodium Tamari/soy sauce)
  • 1T chopped garlic
  • 1T minced fresh ginger
  • juice and zest of 1 lime

Whisk all ingredients in a small bowl and dump over veggies in a roasting pan. Roast at 400, turning every 15 minutes, until veggies are slightly charred and glazed. Serve. Put leftovers over rice or in a tortilla the next day for a quick lunch.

Recipe adapted from Baker by Nature and Pocket Full of Thyme

Simple Chocolate Vegan Ganache

Don’t let your cupcakes go naked, or worse…be slathered in store bought frosting. Use your microwave to whip up a simple tasty vegan ganache. Paired with the best vegan chocolate cupcakes or drizzled you will ever eat or maybe even on PANCAKES, you will wonder why you ever shopped for frosting in the grocery store.

  • 1/2 C vegan semi-sweet chocolate chips
  • 1/2 C nondairy milk of choice (I used almond milk)
  • 2 T sweetener of choice (I used maple syrup)
  • Add-in’s: 1 T cinnamon and/or 1 T espresso powder

Directions: In a microwave safe measuring cup, combine all ingredients except add-in’s. Microwave in increments of 20-30 seconds, until chocolate chips melt. Whisk chocolate chip mixture together until smooth and velvety, then whisk in your desired add-in’s. Refrigerate to set up. When thickened drizzle over cake of choice. I love this recipe best: Vegan Chocolate Cake.

This slideshow requires JavaScript.

Crock Pot Vegan: Sweet Potato, Kale, and Chickpea Soup

And….we’re back! After a few weeks off for bad behavior and a new ACL, I’m glad to be back. I’ve had my eye on this recipe for a few weeks now. It is sweet, savory, smooth and lumpy (in the best chickpea way). It’s sure to keep you full and warm when battling the winter chills. The original recipe calls for farro from Cookie + Kate but since I didn’t have any handy, I grabbed some wheat berries instead which I cooked first on the stove and added toward the end. 


Ingredients
  • 1 large yellow onion, chopped
  • 2 small to medium sweet potatoes, peeled and diced (or butternut squash)-I used a mix of both as I had some cubes frozen from fall.
  • Salt, to taste
  • 2-3 T red Thai curry paste (available in the Asian section at most grocery stores-check to be sure no anchovies or shrimp were sacrificed for your paste)
  • 1 C uncooked farro, rinsed (or 2 C cooked whole grains, like wheat berries, spelt berries or kamut)
  • 6 C vegetable broth (or water flavored with vegetarian bouillon cubes)
  • 1 C coconut milk (from a can-okay to use light)
  • 2 C cooked chickpeas (or one can of cooked chickpeas, rinsed and drained)
  • 1/2 red pepper, finely chopped
  • 1 small bunch of crinkly purple kale or green kale, finely chopped
  • Sriracha to taste, I dropped in 1T
Instructions for crock pot:
Chop and dump. Simple as that. Omit the cooked wheat berries and chickpeas until about an hour before you are going to serve then pop them in the cooker to warm up with the rest of the items. My soup took 6.5 hours in a large crock pot. I used the last hour to add the wheatberries and chickpeas.
Instructions for stove top from Cookie + Kate:
  1. In a large soup pot, heat the oil over medium-high heat.
  2. Stir in the onions, raw sweet red pepper, and sweet potato and a big pinch of salt. Sauté for five minutes, stirring occasionally, until the onions start to soften.
  3. Add the curry paste and stir until the onions and sweet potatoes are coated and the curry is fragrant (about a minute).
  4. Add the farro, if that’s your grain of choice, and six cups of veggie broth or water and bouillon cubes and the coconut milk.
  5. Bring to a boil, then set the timer for thirty minutes, cover the pot and reduce the heat to a simmer.
  6. After thirty minutes, uncover the pot and add the chickpeas. Taste and season with more salt as needed (if it tastes flat, add more). If you chose to use cooked whole grains, add them now. Cover and simmer for another twenty minutes.
  7. Uncover, stir in the kale, add cayenne pepper if desired, and serve.
Notes

Love at first juice

Amazon delivered my Breville Juice Fountain yesterday and today Mr. Wonderful and I made our first juice. Last week we watched Fat, Sick and Nearly Dead and wanted to give a juice fast a try before the holidays.

Let me first tell you how liberating making a juice is. The whole process feels good. The noise feels good. The drinking feels good. The murdering of innocent veggies, feels good!! Even the clean up even feels good! I know, I’m on some nutrient dense high or something but seriously. Good.

This first time was basically about figuring out of how to operate the thing which was surprisingly uncomplicated. Choosing the fruit/veg came via whatever was in the fridge so here is our attempt recipe:

  • 3 navel oranges
  • 3 bunches kale
  • 5 super mini apples
  • 1 C cranberries
  • 12 mini carrots

Juice ingredients one at a time, greens first. DRINK!

This made about 5- 16 ounce juices which is about a one person juice fast day.

image

Overnight Oats: Date & PB2 Edition

I have a love affair with overnight oats now; however, the first time I tried them I gagged and swore them off for good. That is until I discovered I didn’t care for the soaked chia texture present in so many of the overnight oat recipes, it was NOT the actual oats that I found offensive-just the cha, cha, cha chia. I researched a bunch of recipes and discovered that not all oats are created equal and that I could have oats sans chia without any fretting. From then on, I’ve had auto ship attached to my Amazon.com order for Bob’s Red Mill Oats every 30 days (I prefer the extra thick kind) and a full stomach well past the noon hour if I eat them for breakfast. And really, isn’t that every working girl’s dream? To NOT be STARVING at lunchtime? I think so. There is nothing worse than ravenous pre-noon snacking, binge drinking coffee to fill up your belling and/or a casual noon time stuffing that will put a pooch in your pencil skirt and a frown on your face for the rest of the day. Enough about my body image issues…you are here for the food.

jar of overnight oats with banana

Overnight oats:

  • 4 dates, pitted and sliced
  • 1/3 C whole oats
  • 2/3 C nondairy milk, I prefer almond milk (unsweetened)
  • 1 tsp maple syrup
  • 1 heaping T of PB2
  • 1/8 tsp cinnamon
  • 1 banana, sliced just before you drop it into the oats the next day

The night before, add all ingredients but banana into a jar and place in fridge overnight. Next day, drop in sliced banana, stir and enjoy.

Virtual Vegan Potluck Fall Edition

You may have heard me talk about this before and if that is the case…I’m sorry [not sorry]. Virtual Vegan Potluck is coming your way November 16 with a super special featured ingredient….BEETS!

Now, now…wait a second…before you freak out about BEETS please consider that there are going to be a lot of non-beet dishes too. I just wanted to get this super vegan celebration of fall on your radar before your meal planning calendar fills up. I look forward to cooking up a soup as my contribution. I’m thinking a spicy lentil soup, vegan chili or tortilla soup. Any requests?

Organization Lacking…Send Help

So I came to my own blog today to look up a recipe and realized that I haven’t blogged in nearly a MONTH. It’s been a hell of a month. Here’s what is going on:

  • I am mid-semester teaching 4 classes at a local university as a visiting faculty member
  • I’m providing campaign support for a person running for congress through my former full time job, as a part time consultant
  • I am a full time PhD student closing in on my final year of classes about to start really caring about the dissertation process which could take YEARS to finish (OMG)beagles
  • I’m a doctoral research associate at my school discussed above part time
  • I’m married. I think I’m still married to that hunk with the beagles to the left
  • I’m disorganized when it comes to meal planning and can’t stand up for long periods of time because, wait for it….I tore my ACL/MCL and meniscus a month ago playing volleyball in an adult league-yes, I’m old enough to know better

In short, I have no idea if I am coming or going. My commute to and from classes for my PhD program is  between an hour and hour and a half two nights a week and the reading is killing me. I often forfeit my own reading and writing to grade student work. Cooking is the last thing on my mind and I have shamefully eaten pizza and forfeited my CSA pick up more times than I can count in the last six weeks. I’ve gone through nearly all of my frozen “emergency” meals and breads I gathered through the summer and we are just closing in on fall! EEK!

So how to reclaim sanity? Some of you would say, dump some of the items above? I say, that’s not an option right now. I’m looking more for tools, tips, techniques to make my eating better, faster, pre-planned and semi-healthy. Any suggestions?

If nothing else, thanks for listening and sorry for the far and few between posts. Winter semester should be less hectic and more delicious on this blog. Excuse me, I’m off to make overnight oats for breakfast and prep the coffee that gets me though this crazy life.

Yesterday Tacos, Today Taco Soup

Yesterday I made the tacos that I sometimes dream about in the winter, full of summer veggies practically radiating sunshine, tender-crisp, and juicy.  I love tacos, but even I can’t eat them every night for leftovers, so this seemed like the perfect solution: taco soup for the freezer and rest of the week.

Recipe:

Cook all veggies using summer tacos recipe found here spices and all, we will add a little more flavor below due to the dilution from the water. While I was charring all the veggies, I set half of each batch into a soup pot to create taco soup for later in the week.

To that add:

  • 1 tsp epazote
  • 1 tsp oregano
  • 1-2 tsp ground cumin
  • 1 tsp to 1T chipotle en adobo (sauce), depending on your like of heat
  • 2-3 C or 1-2 cans black beans, drained
  • 3 cans diced tomatoes, these can be fire roasted or normal diced tomatoes
  • 2 cubes veggie boullion 
  • 4-6 C of water, depending on your thoughts on consistency of soup

This slideshow requires JavaScript.

Heat all ingredients through give it a taste and adjust the seasonings (salt for sure). Serve warm with a squeeze of lime, vegan sour cream, and tortilla chips or freeze to preserve the summer.

Corn Relish-Diva Style

This recipe comes from a dear friend and client The Canning Diva who taught my book group how to make and can everything from garlic to pickles to strawberry jam and salsa this year. Check out one of her canning, preserving or food dehydration classes in west Michigan or book a private party like I did and bring the Diva to you.

2013-08-18 18.58.37

Before corn season ends and just as pepper season is starting up, I can’t think of anything better than canning a bunch of corn relish then having it retreat to the shelf waiting for winter- a time when I’m hopelessly longing for summer’s sun.

corn relish

Homestyle Corn Relish

  • 4 C white vinegar
  • 1 ¼ C raw vegan sugar
  • 2 T sea salt
  • 8 C corn kernels, fresh is best but frozen corn can be used too
  • 3 C red and green bell peppers, seeded and diced
  • 1 C jalapeno peppers, seeded and diced
  • 1 ¾ C celery, diced
  • 1 C onion, finely chopped
  • 2 T dry mustard
  • 2 tsp celery seeds
  • 2 tsp ground turmeric
  • ¼ C water
  • 2 T ClearJel (The Canning Diva has also substituted Liquid Pectin with great results)

corn relish stock pot - colorsIn a medium-sized stock pot, combine vinegar, sugar and salt.  Bring to a boil over medium heat being sure to stir until all sugar is dissolved.  Gradually add corn, peppers, celery and onion being sure to keep everything boiling.  Stir often to avoid scorching.  Add the spices and stir.

Combine the water and ClearJel, mixing well to create a paste.  After making the paste, mix it well into the vegetable mixture while it is boiling.  Reduce heat and boil gently for 5 minutes being sure to stir often to avoid scorching.

2013-08-18 22.11.47-1

Ladle hot relish into hot jars being sure to leave ½” head space.  Wipe rims with a warm wash cloth dipped in vinegar and secure lids and rings.  Hand tighten.

This recipe can be hot water bathed.  Place jars in water bather and cover with warm water.  Process in a hot water bath for 15 minutes.  Remember, timing doesn’t start until water has come to a full rolling boil.  After

corn relish processed with gloves lids utensil

processing, remove lid and let sit for 5 minutes before removing jars.

EcoTrek Fitness Bars-Yep, They’re Vegan

This is a reblog from Kolene Allen of VeganGR. Periodically they review items for sale that are vegan or accidentally vegan. EcoTrek Fitness bars are available online, sometimes shipped in health/wellness boxes, or if you live in the Midwest…grocery stores and gas stations. My personal fave is the Chocolate Raspberry bar. Tastes too good to be healthy-really, it does.

I would never call myself an athlete, but I do try to keep in shape by running 3 miles 3 times a week. My post run recovery usually includes a green smoothie, normally packed with coconut milk, whatever fruit is in the house, and a handful of spinach or kale.

The times when I’m in a hurry and need something in a pinch, or I don’t feel like fussing with the blender, I reach for an energy bar. There are many on the market, though many of them are not vegan. And of those that are vegan, few qualify as edible due to the taste factor. That all changed when Cari Draft, founder of Grand Rapids based EcoTrek Fitness, sent us a sample of her whole food bars to try out.  Cari founded a program that offers outdoor group workouts that integrate cardio, strength training and flexibility. Then she created her very own whole food bar that is packed with 10 grams of protein and created from ingredients of the highest quality nutritional content. There are no refined sugars, artificial sweeteners or genetically modified ingredients anywhere in the bars.

Despite the fact that these bars contain green foods like spirulina, wheat grass and spinach, you would never know it. There are three flavors to choose from and each one is covered in chocolate and tastes like a candy bar!  Each one is 100% vegan and made right here in Grand Rapids. There are three flavors currently available. Dark Chocolate Toasted Coconut, Dark Chocolate Peanut Butter, and my favorite, Dark Chocolate Raspberry. During my first bite I thought, “There’s no way this is good for me.”  I did a double check of the ingredient label, and I was wrong. These bars are packed full of goodness.

You can find EcoTrek Fitness bars at every single Meijer store and at a number of other places in Grand Rapids and Michigan, or buy them online.

For more vegan goodness, check out VeganGR.com

The sandwich so fresh & juicy you eat it over the kitchen sink

Growing up my family didn’t do a tremendous amount of gardening unless it was in the form of flowers, which my mother has always been extremely fond of. The landscaping of our home was meticulous. My grandma however, had a pretty good size garden which was kinda like a neighborhood garden before community gardens were all the rage. She and her neighbors would plant their favorite veggies between the sticky cherry tree and big tire swing, in front of the pine layer separating her home from the IGA, and just beyond the sandbox so that none of us would “go messin’ with it.” The garden made for two things: 1) the most amazing go-cart racing track was formed from its perimeter, and 2) the amount of tomatoes that came from it in August/September was something of the stuff legends are made.

IMG_7875

This is the “grown up” vegan version of the tomato sandwich that we would eat nearly every day in the summer at the peak of tomato season which was comprised of gooey Wonder Bread, Miracle Whip, heavy with salt, and layered with iceberg lettuce and fresh, juicy tomatoes. So messy and heavy that you would have to eat the sandwich over the sink or end up changing your shirt after lunch.

Tomato Sandwich

  • 2 pieces soft vegan bread, toasted lightly
  • 1 medium sized ripe tomato of your choice
  • 2 big knifefuls of Vegenaise, use BBQ flavor if you want it to really make it sing
  • 1 handful, fresh picked greens of your choice, pictured here, arugula

IMG_7874

To assemble: spread Vegenaise on bread, layer tomato slices with arugula, smash and enjoy over the kitchen sink.

VeganGR’s Not All Sugar Is Created Vegan

This blog first appeared on VeganGR and is written by the talented and wonderful Jon Dunn.

Sugar in the Raw | 35/365Ever heard of bone char? It’s got a few names and according to wikipedia, you may also know it as bone black, ivory black or animal charcoal. It’s a pretty gruesome process as you can imagine, but the short of it is, animal bones are baked in an low oxygen environment to create a charcoal of sorts. It’s a 200 year old process, first patented in 1812! The applications for the finish product are plentiful.

Tricalcium phosphate, the resulting product is used as an anti-caking agent in spices. Also this stuff is used in cheese, and as a raising agent. But the trickiest use of them all for vegans, is as a refining agent for sugar.

Thankfully we live in a time where raw and natural sugars are more easily available. But sugar is in so many prepared foods. Is the sugar that went into those products vegan?

So here are our questions for you.

1. Were you aware of bone char and it’s relationship to the refinement of sugar before you read this post?

2. If yes, are you concerned about your sugar?

3. Do you go so far with sugar to make sure that any product you buy that is made with sugar has only vegan sugar?

For more Vegan-related issues, places and things, head over to vegangr.com

VeganGR Blog Take Over Part 2: Quick Sauerkraut

You know you have good friends when they take a veggie gift and your smartass comment about blogging for you and actually do it. So Jon and Kolene over at VeganGR have been the recipient of some ridiculous veggies from my summer surplus…Jon, the resident chef, and Kolene, the photographer came up with Sauerkraut when faced with a do or die cabbage situation a few weeks ago. Here’s what happened, according to Jon:

Faced with an exorbitant amount of cabbage (I mean, A TON of cabbage. See previous post about Adrienne’s gift of 40lbs of veggies), there was only one choice.

Sauerkraut.

Now, let’s be clear about this. I am lazy, and I hate waiting. I also have a mild fear of home fermentation.  Recent attempts at rejuvelac based cheese turned into a science experiment into mold than a delicious vegan chèvre. I am determined to plod on, but until I become the king of producing lactic acid, I needed another solution.

A Google search for “quick sauerkraut” turned up far fewer hits than you’d think. This recipe looked promising, so I went with that.

I didn’t have apple cider on hand, ‘cause like, who does? So I doubled the water. To balance and bring in the sugar I think the cider was intended to, I added a little sweetness. The result was really nice, and the hit of a recent summer barbecue!

Ingredients:

  • 1 T olive oil
  • 1 onion, sliced very thin
  • 1 medium green cabbage, sliced thin
  • 1 ¼ C apple cider vinegar
  • 1 C water
  • 1 T salt
  • 1 tsp caraway seed
  • 2 T sugar

Directions:

  1. Heat oil in pan, and add onion. Cook over medium heat until onion turns translucent.
  2. Add rest of ingredients and bring to a boil. Cook covered over low heat for 30-45 minutes. You want the cabbage nice and tender. Keep an eye on it, you may need to add a little more water.

This slideshow requires JavaScript.

Curried Chard Vegan Frittata

Swiss chard is one of those greens I’m not wild about unless it is IN something else or heavily, heavily seasoned. This recipe is modified from Vegan Brunch in the spirit of curried scramble and can be customized with herbs and seasonings in just about any combination. It keeps well and tastes amazing tossed into a pita with arugula and garlic vegenaise for lunch the next day.

  • 1 tsp olive oil
  • 6 cloves garlic, thinly sliced
  • 1 bunch swiss chard, rough stems removed, chopped well (about 4 cups)
  • 2 tsp dried oregano
  • 1 pound firm or extra firm tofu
  • 1 T tamari or soy sauce (use tamari if gluten free)
  • 1/4 C chives, chopped
  • 1/4 tsp hot curry powder
  • 1/4 tsp sweet curry powder
  • 1/4 tsp granulated garlic
  • 1/4 tsp granulated onion
  • 1/4 tsp white pepper
  • 1/4 teaspoon tumeric
  • several dashes fresh black pepper
  • 1/4 cup nutritional yeast flakes
  • salt to taste

Preheat oven to 400 F.

Preheat a large heavy bottomed pan over low-medium heat. Add the oil and the garlic and cook for about 3 minutes, stirring occasionally. What you’re doing here is “blonding” the garlic, it’s ready when it’s turned a light amber color.

Add the chard, oregano, all spices, chives, and and turn the heat up to medium high. Saute for about 5 minutes, until chard is completely wilted/ Add splashes of water if needed to get the chard to cook down. Turn the heat off.

While the chard is cooking, prepare your frittata base. Give the tofu a squeeze over the sink to remove a little of the water. Use your hands to crumble and squeeze it in a large mixing bowl, until it has the consistency of ricotta cheese (about 3 minutes). Add the remaining ingredients to the tofu and mix well. When your chard is ready, incorporate it into the tofu. Be sure to get all of the garlic, but if there is any moisture in the pan try to avoid adding it to the tofu. Taste for salt.

Lightly grease an 8 inch pie plate and firmly press in your frittata mixture. Bake for 20 minutes, until firm lightly browned on top. Let cool for about 3 minutes, then invert onto a plate and serve.

This slideshow requires JavaScript.

A Tale of Two Vegan Ranch Dressings

We haven’t purchased dressing from a store since my discovery of flavored balsamic dressings years ago, but ranch was always hard to substitute for dips and faux chicken tenders. Ranch dressing to dip well just about any and everything in from french fries to carrot sticks has become an American obsession and being vegan-ish doesn’t make me long any less for a dressing for this same purpose!

For a long while I searched high and low for a store-bought veg ranch dressing that I could embrace and love a la Hidden Valley Ranch. Alas, I’m not willing to put up with high fructose corn syrup OR things with faces in my dressing anymore, so to the Internet I went. I have tried many shorter order ingredient lists to make vegan ranch dressing and they are okay [the second recipe is the best small ingredient list dressing I have found for ranch], but this first recipe, tastes like REAL ranch dressing. Drip some veggies in it or serve over a salad. Keeps for about a week in the fridge.

  • 1 C soy Greek-style yogurt
  • 1 C vegenaise
  • 1 C almond milk, unsweetened [plus 2 tsp white or apple cider vinegar]
  • 1/3 C vegan sour cream
  • 1 tsp garlic powder
  • 1 tsp onion powder
  • 1 heaping T freshly ground black pepper
  • 1 tsp kosher salt
  • 1 T white vinegar [apple cider vingar will work in a pinch too]
  • 1 T lemon juice
  • 3 T fresh parsley, finely chopped

Directions:

  • To make “buttermilk” mix almond milk with 2 tsp of vinegar until frothy, set aside for up to 5 minutes to develop buttermilk consistency.
  • Mix the soy yogurt, vegenaise, almond “buttermilk” and vegan sour cream together in a large bowl.
  • Stir in the garlic and onion powders and pepper, then add the salt, vinegar, lemon juice and parsley and stir until just combined. 
  • Cover and refrigerate until needed, up to a week.
  • Veganized from a Food Republic recipe.

ranchdressing_recipe

In a hurry? Try this recipe instead. Not quite as rich like regular ranch dressing but makes for a good schmear on a burger, sandwich, and dipping sauce.

  • 1 C vegenaise
  • 1/2 tsp garlic powder
  • 1/2 tsp onion powder
  • 1/4 tsp black pepper
  • 2 tsp parsley, chopped fresh or 1 tsp dry
  • 1/2 C unsweetened soymilk or almond milk
  • salt to taste

Directions:

  • Whisk all ingredients together and chill before serving. Add a little more nondairy milk if you need to thin dressing.

Tempeh, Lettuce, Tomato Sandwiches (TLT)

THE sandwich we eat just about once a week in the summer…sometimes more frequently 🙂 I’ll let the recipe do the talkin’ this time.

Thanks to 101 Cookbooks for the base recipe.

1/4 C soy sauce
2 T balsamic vinegar, I use Tangerine flavored
2 T pure maple syrup
3 T adobo sauce from a can of chipotle peppers

8 ounces of tempeh, cut into 1/3-inch thick strips

1 small basket of cherry tomatoes (2 cups)
1/4 C extra-virgin olive oil olive oil
1 T pure maple syrup
scant 1/2 teaspoon of salt

1 small head of romaine lettuce, cored, then cut into 1/4-inch ribbons
1-2 large avocados, mashed with a pinch of salt just before assembling
4 or 8 extra-thin slices of hearty whole grain bread, well toasted

Preheat oven to 350F degrees.

Whisk together the soy sauce, balsamic vinegar, maple and adobo sauce. Pour 1/3 of the tempeh marinade into an 8×8 baking dish (or something comparable) – you want a dish that is just big enough to hold the tempeh in a single layer – this way it will be fully enveloped by the marinade. Pour the remaining marinade over the top of the tempeh, cover and keep in the refrigerator for a couple hours, overnight or until ready to use.

While the tempeh is marinating, go ahead and roast the tomatoes. Cut each tomato in half and arrange them in a large oven-proof baking dish. Mix together the olive oil, sugar, and salt and pour this over the tomatoes. Gently toss them a bit, making sure they all get coated, finishing with each tomato facing cut-side up. Place in the oven and bake for 45 minutes or so, until the tomatoes are shrunken and sweet [I have also left them whole with no consequence].

When the tempeh is done marinating heat a large pan over medium-high heat and cook the tempeh slices for a few minutes on each side. You may need to do this in batches if you don’t have a big enough pan. Set the tempeh slices aside until you are ready to assemble the sandwiches.

To assemble each sandwich take one slice of bread and slather a generous layer of mashed avocado or vegenaise. Place a small helping of the shredded lettuce on top of the avocado, a few tomatoes, then a few slices of the tempeh, and more tomatoes. Enjoy either open faced or topped with another avocado-slathered bread slice.

Note: we call these tomatoes “crack tomatoes” in our house…they freeze amazingly, so go ahead and make a triple batch. They taste great on tacos, in chili, tortilla soup, etc.

And some nights you eat tomatoes for dinner…

Who can really argue with the taste of a Michigan tomato in July? I can’t. So in taking all the mystery out of this post…some nights you simply eat tomatoes for dinner. Shown below are heirloom varieties Green Zebra and Beefsteak from Good News Farm.

This slideshow requires JavaScript.

Ingredients:

  • Tomatoes
  • Salt
  • Pepper

Slice, cube or dice. Salt and pepper to taste. Noms.

Peanut Kohlrabi Slaw Wrap

Kohlrabi has been gathering in my crisper for weeks. It was beginning to outnumber the greens, which if you are a CSA member of any kind you know that greens are prolific this time of year while we wait for all of the other delish stuff to grow-so this was becoming an emergency situation. Mr. Wonderful and I wanted a quick dinner and this fit the bill. The recipe below is for peanut kohlrabi slaw, we served this slaw over Gardein Seven Grain strips on a reduced fat flour tortilla, it was like a salad in a tortilla. Super simple, fast, and made from the stuff I found in the fridge.

Need a few more recipes for the space-aged looking veg? Check out the kohlrabi archives…yep, they exist.

  • 1/2 head green or Asian cabbage (finely shredded about 1 lb)
  • 2 T peanut butter (smooth)
  • 1 T peanut oil
  • 2 T rice wine vinegar
  • 1 T soy sauce
  • 1/2 tsp brown sugar
  • 3 cloves clove garlic (minced)
  • 1 tsp powdered ginger
  • 1/4 tsp cayenne pepper (taste)
  • 2 kohlrabi (bulbs peeled and grated or Julienne 1 1/2 to 2 cups)
  • 3-4 large radishes, grated or minced
  • 1/4 C dry roasted peanuts (garnish)
  • 1/4 C dried currants
  • salt
  • pepper
  • sesame seeds (roasted, garnish)

Directions:

Make the dressing in a mason jar. Put all items but sesame seeds, peanuts, radishes, currants, kohlrabi, and cabbage into a jar, shake vigorously. Taste a few times and readjust seasoning as you wish.  Toss together with all other ingredients.

Good additions would be: grated carrot, green onion, water chestnuts, crispy rice noodles, and fresh grated ginger. Adapted from Food.com.

This slideshow requires JavaScript.

Shit! I don’t have any taco seasoning.

This is my second Shit! I don’t have any…. recipe blog post. My first had to do with chili powder. My anger level seems to have risen as this title involves an actual explicative and before I was just using a mild substitute; or maybe I just REALLY wanted to make tacos tonight…I digress and give you taco seasoning for when you realize you have none. This recipe shakes out to be WAY less sodium than the packaged brands, so do yourself a favor and just make it yourself before you have a taco seasoning emergency. It takes all of about 3 minutes. I made 5x the amount (some math involved, hooray) and store it in a mason jar to keep any new emergencies at bay.

  • 1 Tbsp chili powder
  • 1/4 tsp garlic powder
  • 1/4 tsp onion powder
  • 1/4 ancho chili powder (this is an add in for more flavor, not necessary for “normal” flavor)
  • 1/4 tsp crushed red pepper flakes
  • 1/4 tsp dried oregano
  • 1/2 tsp paprika
  • 1.5 tsp ground cumin
  • 1/2 to 1 tsp sea salt (more or less to taste)
  • 1 tsp black pepper

1. In mason jar, measure out all items listed above and give it a little shake until well mixed. If you like it spicy, add more red pepper flakes or mess around a little and try some dried chipotle pepper, etc. This is totally customizable. Adapted from allrecipes.com and many other bloggers before me.

This slideshow requires JavaScript.

Strawberry Salsa

So you went crazy this past weekend and picked a zillion berries and now you are worried that your fresh strawberries might not be so fresh by the time you want to use them? Here’s a little trick from The Canning Diva to buy you a little bit of time while you process those berries:

  • Put your strawberries in a large bowl and run cold water over them.
  • Add 1/4 cup of vinegar (distilled white or apple cider) to every 2 cups of water.
  • Let them soak for about 5 minutes.
  • Drain, rinse, and dry on a towel-lined cookie sheet.


Now get to work using the fruit of your labor in this unusual dish sure to delight at your next porch party or holiday party. In the dead of winter, if you pull out a jar of this to take for a dish to pass, you will look like a rock star. This past weekend, my friend Jen, her mom, Mrs. Jen and I went to work churning out two batches of this sweet and savory salsa. I can’t wait to try it over some vegan cream cheese on a cracker or a corn chip.

The Diva’s Signature Strawberry Salsa

  • 12 cups of bite-size chopped strawberries (about 4 quarts)
  • 1/2 cup Agave Sweetener
  • 5 cups of raw, unbleached sugar (if this huge amount freaks you out you can use more Agave, Stevia or Splenda, consistency will vary however-we used 3 C sugar and a mix for the rest)
  • 1 1/4 cups Vidalia onions, size is your preference (mine are diced small)
  • 1 cup diced red onion
  • 1 cup of jalapeno (if you want more heat, keep some seeds) I remove all seeds and chop fine in my small food processor
  • 4 ounces of fresh lime juice
  • 1/2 cup chopped fresh cilantro
  • 3/4 cup red bell pepper
  • 1/2 cup green bell pepper
  • 1/4 cup finely chopped mint
  • 1 tsp sea salt
  • 1 1/4 cups of apple cider vinegar

This slideshow requires JavaScript.


Directions from the Diva: Boil sugar, vinegar and agave sweetener until sugar has dissolved. Add all onions, peppers, herbs, lime juice and spices and bring to a boil. Turn off heat and add the strawberries. Mix well.

Using a slotted spoon, hot pack salsa into pint size jars being sure to include ample liquid in each jar so long as the salsa isn’t too watery. Leave a ½” of headspace for proper processing. (I filled 7 jars with salsa and had 1 pint left over that was pure liquid. Process the liquid the same as the salsa and use it as a marinade or the base of a sweet and savory cocktail)

As always, be sure to wipe your rims with a warm cloth to remove any liquid. Seal each jar with lids and rings and process in a hot water bath for 20 minutes. Processing doesn’t begin until after the water is at a rolling boil! 


Those who can, should…well, Can.

I love veggies. I mean it would be tough to be veganish and not adore vegetables (let’s just pretend that eggplant is a toxin because save eggplant, I love all veggies-I hate, no loathe, eggplant);  but veggies pickled? Well that has to be about as close to bliss as one can get eating summer food straight from a jar in the off season (if mine last that long).

My day job is as project director at a public relations firm, this past winter we retained a client called The Canning Diva. She came to our first meeting with a jar of salsa and even if she walked out the door as a client tomorrow, I would remain close friends with her. She’s “good people” as my friend Josh Hiller would say. I’ve drank the Kool Aid. I now measure and use ratios in the kitchen. The Canning Diva makes canning accessible and dare I say fun. She teaches preservation methods to all from novices to seasoned veterans and everyone in between, her enthusiasm for the art of canning is frankly unmatched. I mean she is TRULY excited about preserving food as art.

About a month ago, I invited The Canning Diva to my book group (we stopped reading books like years ago) and we created all sorts of delish cocktail delights like pickled Brussels sprouts, carrots, and asparagus; a session from which all members left feeling confident, inspired, and maybe a little drunk…we had to TRY the cocktail pickles The Canning Diva brought that showed us our finished product- I mean it was absolutely necessary we know what we were getting ourselves into, right? Sidebar: do not even get my friend Julie talking about the dry wine pickled garlic cloves…she might be having a love affair with them. They are exceptional.

I held off experimenting with pickling until Michigan asparagus came into season at my fave local farm, Krupp Farms, whereupon my gal pal Jen, her mom, Mrs. Jen, and I decided to take a cloudy summer Saturday and turn in into a canning extravaganza! We canned over 140 jars of delish summer surprises in one very full day.

While my goodies sit on a shelf, waiting to “cure”, I leave you with one of my favorite things to come out of a jar since peanut butter…The Canning Diva’s Pickled Asparagus recipe. I’ll share the strawberry recipes we worked on soon too.

The Canning Diva says: a great side to a frothy beer or an excellent alternative to celery in a Bloody Mary! If you would prefer a non-alcoholic splendor, they taste excellent in a salad or an addition to a relish tray.

Ingredients

  • 7 lbs asparagus
  • 5 cups white vinegar
  • 5 cups water
  • ½ cup pickling or canning salt
  • 6 cloves of garlic, whole
  • ½ tsp dill seed
  • ½ tsp mustard seed per jar
  • ½ tsp crushed red pepper flakes per jar

This slideshow requires JavaScript.

As usual, prepare all of your jars ahead of time and have your lids and rings setting in boiled water. If you don’t know how to do this…please, get with Diane, AKA The Canning Diva at one of her Canning 101 classes offered in GR. It will open a whole new world to you for food preserving and SAVING MONEY by preserving the summer harvest.

In a large stainless steel stock pot, combine vinegar, water and salt. Stir well and bring to a boil, stirring to dissolve the salt. Place a garlic clove, ½ tsp dill seeds, ½ tsp of hot pepper flakes and ½ tsp mustard seeds in each jar. Raw pack the asparagus into each jar leaving a generous ½” head space.

Ladle hot liquid into jars being sure to maintain the ½” headspace. Remove any air bubbles using your canning utensil or the handle of a wooden spoon. Adjust headspace if necessary.

Tip: If you run out of pickling liquid, use half the parts listed above, boil and fill jars accordingly. Never fill your remaining jars with just water – it will lessen the acidic level and cause food to spoil.

Using a warm wash cloth dipped in vinegar, wipe each rim and screw bands. Place lids and rings on each jar and hand tighten. Place jars in water bather and cover with water. Process the jars for 10 minutes. Remember, processing time doesn’t begin until the water is at a full rolling boil.

We canned 10 lbs of asparagus in varying sized jars from pint to half pint, so we doubled this recipe AND then needed an additional recipe of JUST pickling brine so we whipped up 3 brine recipes in all. Super simple to fix a brine error if it happens is what I’m getting at.

Full disclosure: The Canning Diva is one of my clients, I paid for a class as did a bunch of my gal pals about a month ago, then we were unleashed into the world of canning. I wrote this blog to share this info, a divine recipe, and help bring awareness to this craft during the Midwestern summer bounty, not necessarily to promote her business; however, if that also happens…AWESOME because this is a skill I should have learned a long time ago. Thanks Canning Diva!

Wheat Berry Spring Salad

A recipe doesn’t have to be very complex. Sometimes I just grab stuff that is either: 1) about to go bad in my fridge, 2) really fresh in my fridge, or 3) stuff that sounds good and hope it all tastes good together. This was #3 for a quick dinner and several more lunches.

Not rocket science, hell sometimes I don’t even measure…

Ingredients:

  • Everything in my fridge cut up (asparagus raw, tomato raw, english cucumber, dried cranberries, red grapes halved, a little romano cheese cut in chunks-0mit for vegans)
  • 2 c cooked wheat berries

Dressing :

  • 1/2 C apricot balsamic vinegar (or any other flavor really)
  • 1/8 C evoo
  • salt and pepper to taste

Tossed the dressing with the wheat berries and severed over microgreens. Tasted amazing the next day in a pita.

Wheatberry Salad