
The first tomato of each season I dedicate to Gramma Helen and her love of tomata sammiches. Read more about this sandwich in a previous post.

The first tomato of each season I dedicate to Gramma Helen and her love of tomata sammiches. Read more about this sandwich in a previous post.
Posted in CSA, Dinner, Less is more, Meatless Monday, Michigan, Recipes, Seasonal Ingredients
Tagged eat your veggies, summer veg, tomatoes, veggies
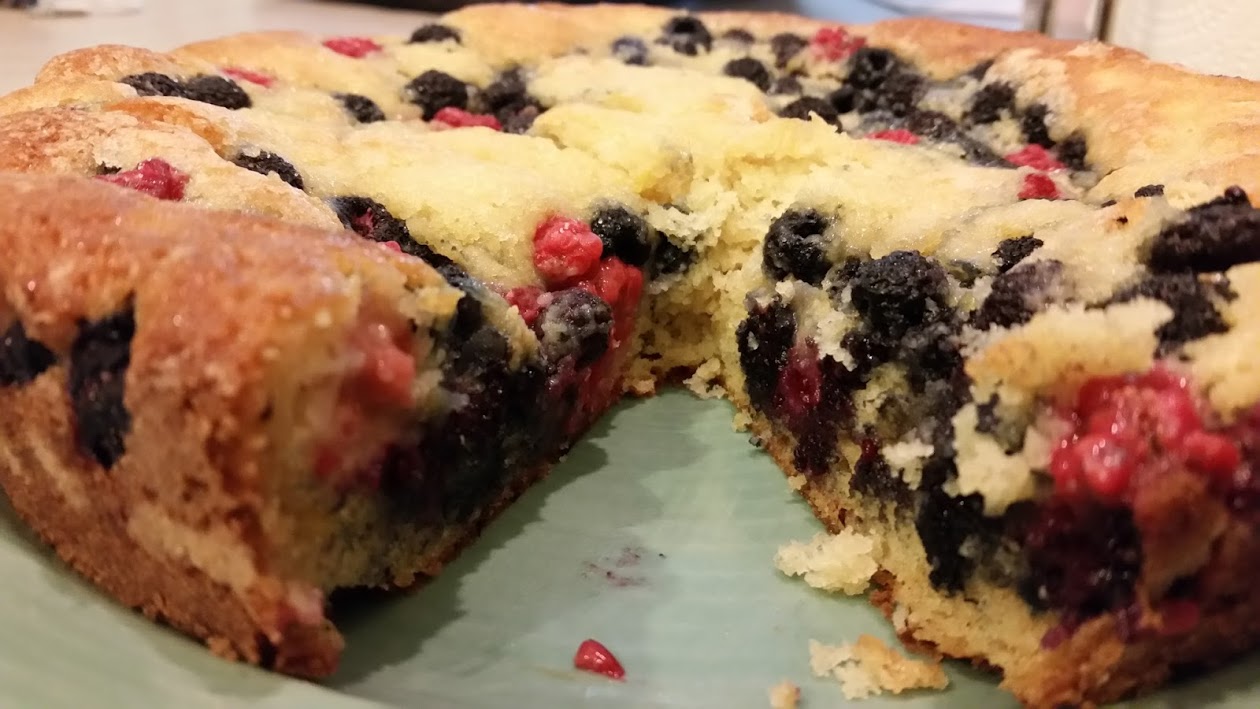
It’s mildly embarrassing to me that the raspberry bush that the “birds planted” in my yard does better than the one that I water and actually care for regularly. No matter, the birds dropped it in the perfect spot, my old garden box, so I get to benefit from their ingenuity I suppose in some form. The raspberries that humans planted were sparse, but large, red and delicious while the raspberries that the birds left us are small, black and a little more tart so I looked for a recipe where I could combine them to get the best of both worlds and I found it, in a cake on one of my fave websites The Smitten Kitchen. I veganized it and was good to go with what is now one of my favorite recipes for any berry. This recipe makes one thin 9-inch cake.
1 cup (130 grams) all-purpose flour
1/2 teaspoon (2 grams) baking powder
1/2 teaspoon (2 grams) baking soda
1/4 teaspoon salt
1/2 stick (56 grams) unsalted butter substitute, softened ( I used Earth Balance )
2/3 cup (146 grams) plus 1 1/2 tablespoons (22 grams) sugar, divided ( make sure it’s a vegan brand )
1/2 teaspoon pure vanilla extract
1/2 teaspoon finely grated lemon zest ( it’s optional but man does it take this to a new level of yum )
1 large (57 grams) vegan egg of choice, I used a flax egg
1/2 cup (118 ml) well-shaken buttermilk ( to make vegan buttermilk, I took 1T of white vinegar – you could also use lemon juice for this – and added it to 1/2C unsweetened Califia almond milk, let it set for a few minutes and then beat the crap out of it with a whisk – very technical, I know)
1 cup (5 ounces or 140 grams) fresh raspberries, I used a mix of red and black
Preheat oven to 400°F with rack in middle. “Butter” and flour a 9-inch round cake pan.
Whisk together flour, baking powder, baking soda, and salt and set aside. In a larger bowl, beat vegan butter and 2/3 cup (146 grams) sugar with an electric mixer at medium-high speed until pale and fluffy, then beat in vanilla and zest, if using. Add egg and beat well.
At low speed, mix in flour mixture in three batches, alternating with vegan buttermilk, beginning and ending with flour, and mixing until just combined. Spoon batter into cake pan, smoothing top. Be careful, make sure the middle is not more dense than the sides here or you will have a dry outside and too moist of a middle. Scatter raspberries evenly over top and sprinkle with remaining 1 1/2 tablespoons (22 grams) sugar.
Bake until cake is golden and a wooden pick inserted into center comes out clean, 20 to 25 minutes. Cool in pan 10 minutes, then turn out onto a rack and cool to warm, 10 to 15 minutes more. Invert onto a plate.

Adapted from Gourmet, June 2009 and veganized from Smitten Kitchen
Posted in Baking, Dessert, Recipes, Seasonal Ingredients, Vegan, Vegetarian
Tagged buttermilk cake, Cake, vegan cake
Sometimes you have a lot of great ingredients on hand but lack the imagination to put them all together in order to make sense in your tummy. Tonight was one of those nights. Beautiful tomatoes and arugula from our CSA, an abundance of lemons from a 10 for $10 sale a few weeks ago (just about to go bad), and a package of Melissa’s Steamed Lentils with an expiration date fast approaching. As I was turning the lentils over in my hand, a recipe conveniently placed on the back of the box told me time to make a salad!

Dressing
Put all ingredients into a mason jar and shake what your mama gave ya.
Salad
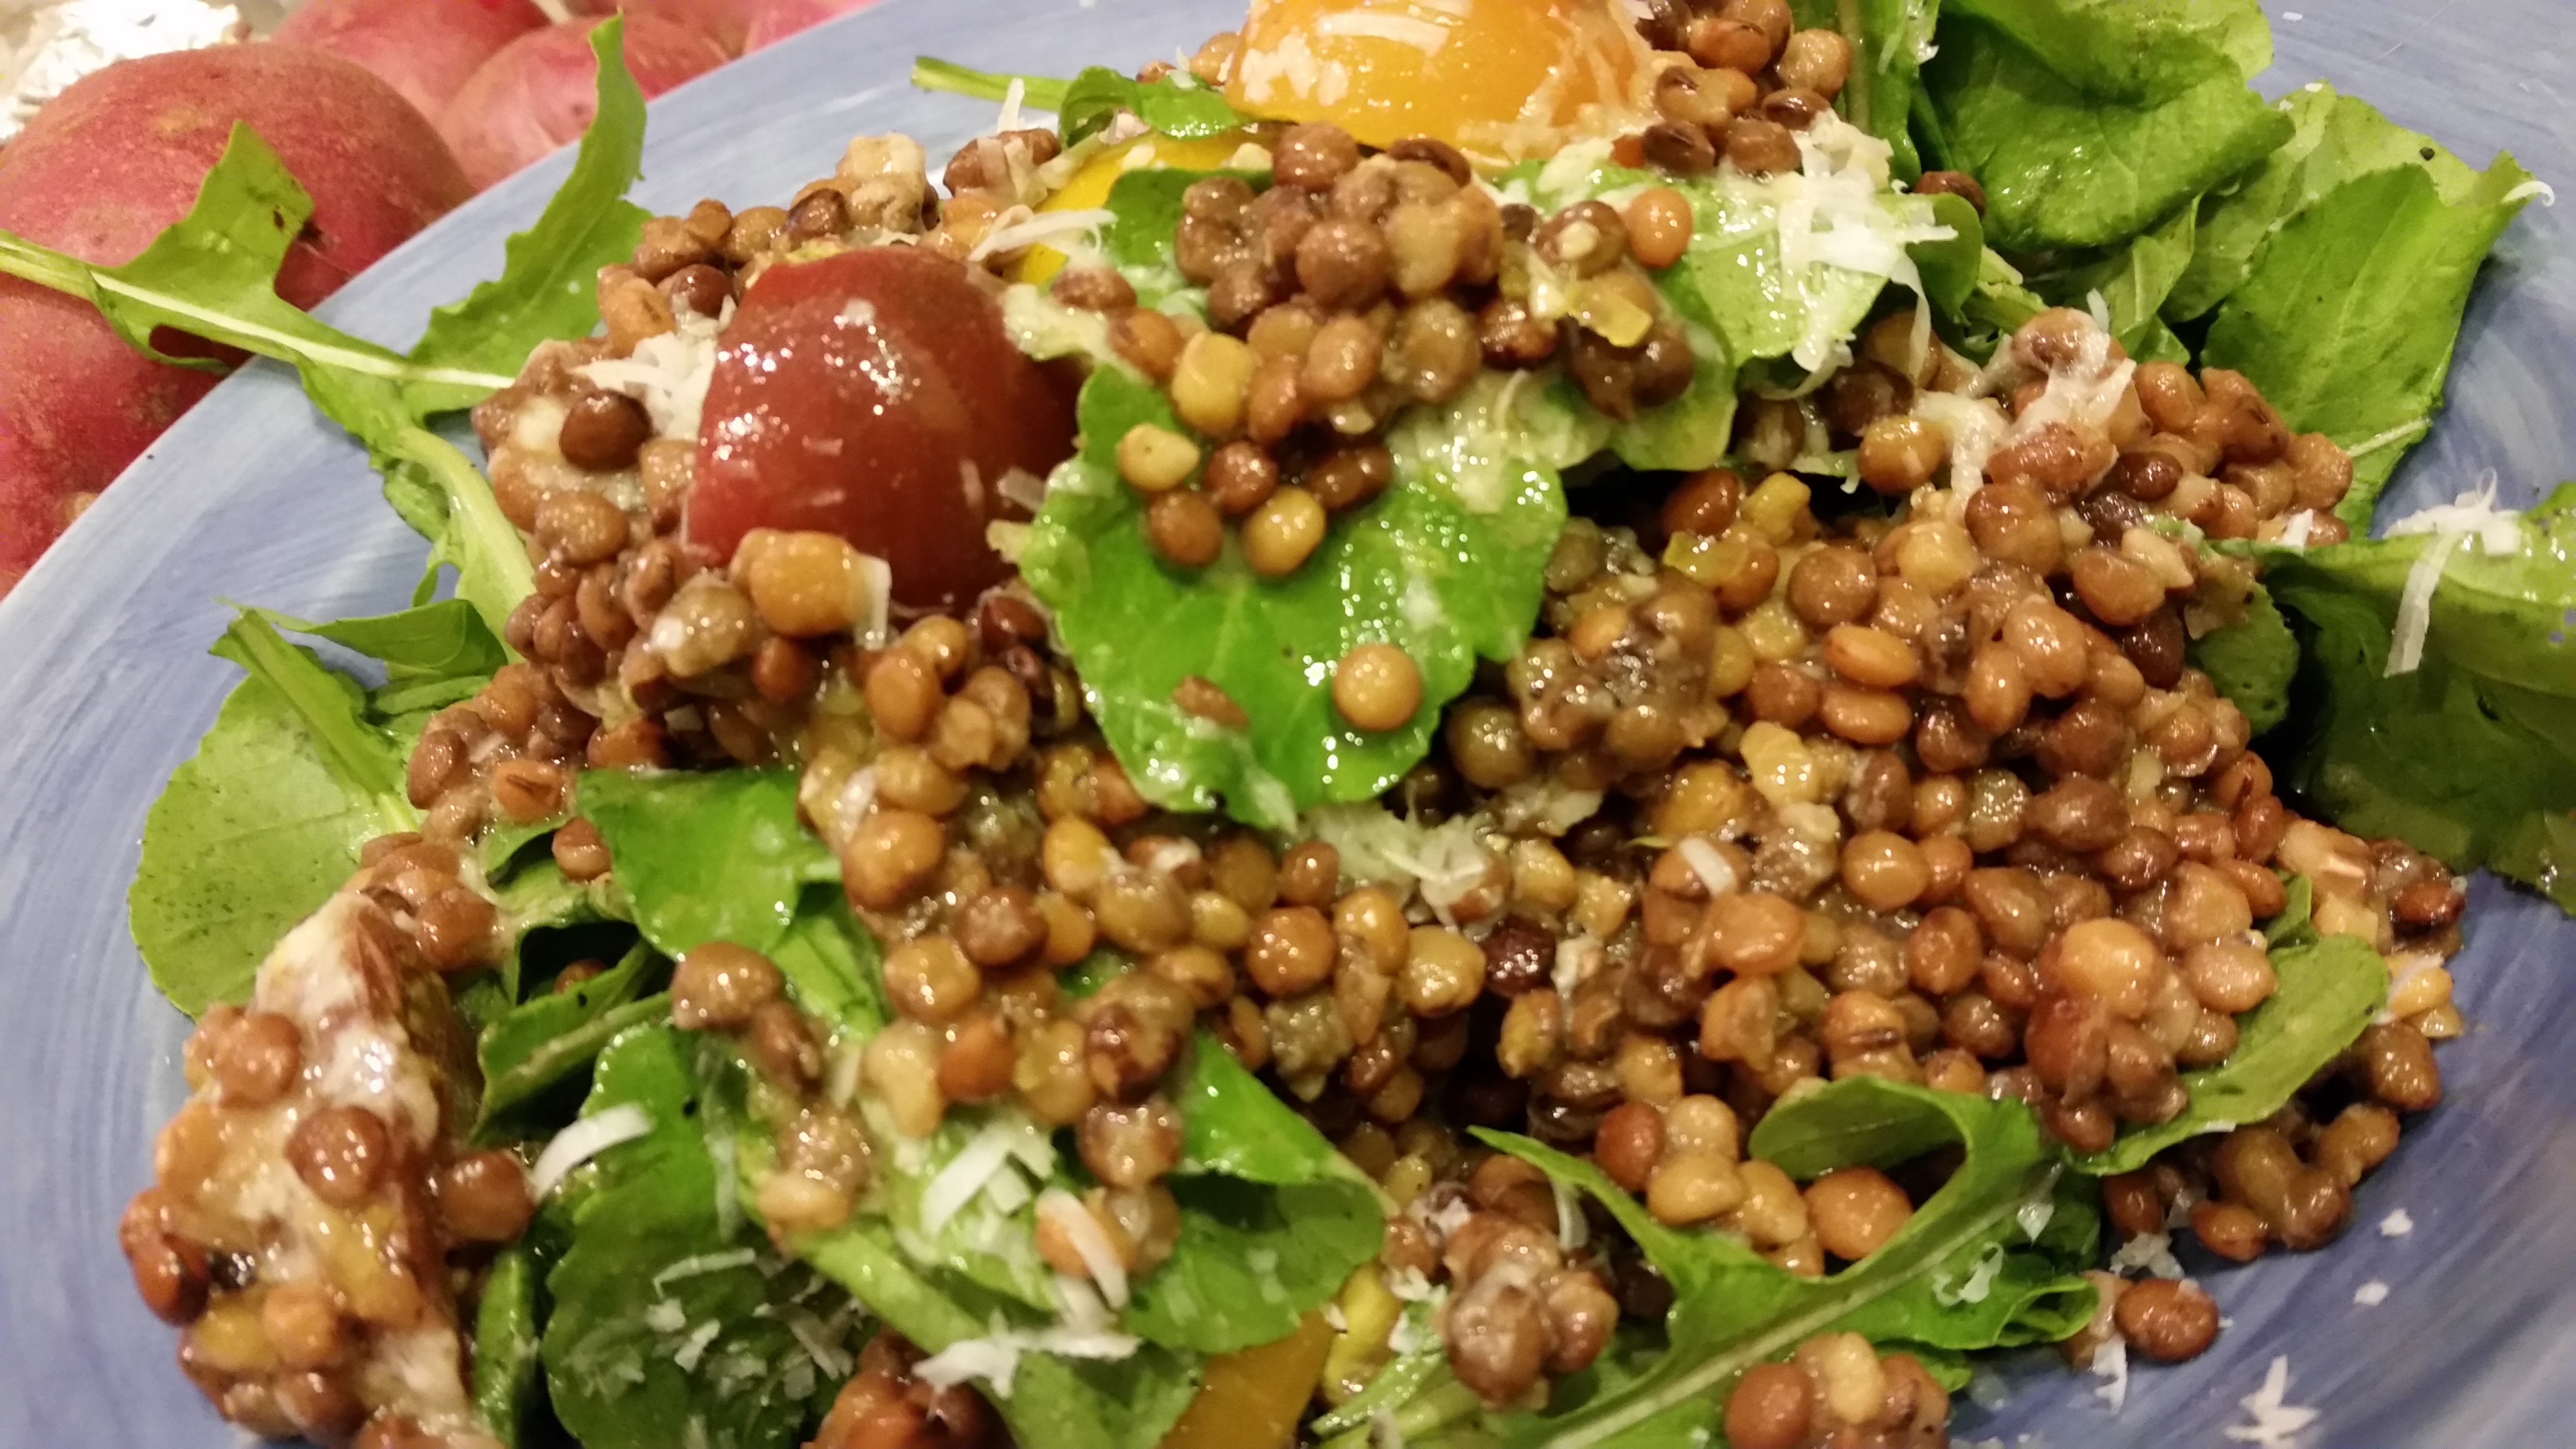
To make salad, toss arugula, tomatoes and lentils in a bowl with zesty lemon dressing, eat cold or at room temperature.
Vegans and vegetarians rejoice, Michigan growing season is here. It’s time to binge on sweet corn, greens, tomatoes, blueberries, fresh herbs and finish up that root cellar supply to make way for the best season in our eating culture. By this time in the summer, following what seems to be the longest potato and squash winter ever, I’m ready for just about anything that hasn’t been on a shelf or procured from my local grocer. Conversely, I know what my first CSA greens season looked like, felt like and tasted like which was overwhelming on all accounts. For example a pound of greens doesn’t SEEM like a lot until you get it home, have to process it and store it so as not to have just one day of fresh but rather, stretching the fresh to a week or so. This idea is tougher than it seems. So what do you need in your kitchen to be successful during a CSA season? Here are a few things Mr. Wonderful and I cannot live without:
1. Salad spinners (yes, plural): we use 3. One that holds plain greens that are ready to eat, one that is always either in the sink or at the ready on the dish rack, and one that is usually holding a salad prepped for dinner that night or for a quick lunch – dressing on the bottom (built like those mason jar salads) so a quick toss and I have a meal.
2. Quality Santoku knife: we bought ours off Amazon for $10.00. I was ready to spend upwards of $100.00 for a specific brand, but surprisingly the highest reviewed one at the time cost just $10.00 (it’s $11.00 now), with a “midrange” nicely reviewed model at around $36.00 for a name you might recognize. Regardless of your budget there is a knife out there you can afford. Keep it sharp, don’t run it through your dishwasher (hand wash that thing) and it should last for years. Sharp is important when dicing spring onions and herbs so you don’t bruise them which leads to yucky discoloration.
3. A “go-to” veggie cookbook: My newest obsession is this book by Terri Hope Romero, co-author of Veginomicon which is a veg cult classic, her newest, Salad Samuri has a fun title and has breathtaking photos (hello, you need photos in a cookbook, right?). The dressing section alone is worth the purchase. Another one I love a lot is the Oh, She Glows Cookbook. Angela Liddon also runs a killer blog that a CSA blogger friend of me also loves, so bow to the peer pressure of your CSA members and get on board the veggie train.
4. Ice cube trays: What better way to freeze single-serving broth cubes, herbs before they go bad, and pesto when basil season is upon us? An ice cube tray of course! This model is particularly cool because it has a lid to keep your freezer and everything in it from smelling like garlic (I mean some people don’t like that). The single servings pop out easy and you can drop them immediately into a pot of freshly cooked and drained pasta or start a soup with them. My fave hack is to drop herbs into the individual compartments cover with a little olive oil and water then when I need it for a saute or something I just drop it in a hot saute pan let the water evaporate and then add the other ingredients for my meal.
5. Green bags: Don’t let the “as seen on TV” label scare the crap out of you. These things work. Enough said, go buy some. They carry them at most Meijer stores locally too. They are, dare I say it, magical.
6. Veggie wash: While the veggies at the Blandford CSA are some of the cleanest I’ve ever come across in a CSA upon pick up. Read the dirty truth about veggies here: the top 10 fruit/veg offenders. Well get those veggies sparkling in a nontoxic way with this quick spray by Honest Company followed by an earnest cool water rinse. I’ve found this brand at Target recently but Amazon has a better price. Feeling a little more salt of the Earth? I’ve used a concoction of 50% white vinegar and 50% water in a spray bottle in a pinch. Be sure to rinse well under both accounts as the spray and vinegar both have a lingering smell.
What are your go-to kitchen hacks for surviving CSA season? Let me know what I’m missing out on below.
A version of this blog post first appeared on the Blandford Farm CSA Blog.

Quick post here. I know it has been tooooooo long and I am reallllly sorry. This will make things better.
Maple mustard dressing came to life when Mr. Wonderful said “can we do mustard dressing?” Yes…yes we can. Here’s how:
Very scientific in measurements 😉
Makes about 1/2 cup
1 glug extra virgin olive oil
2 glugs maple syrup
1-2 glugs balsamic vinegar
3 big squeezes of your fave mustard
Water to get to your favorite consistency
Salt and pepper to taste
Whisk all ingredients together in a small bowl. Whisk in water until you reach that ideal consistency. Pour on that lovely salad or use to dip stuff in. I feel like this would be amazing on potato salad. Happy summer salad days.
Amazon delivered my Breville Juice Fountain yesterday and today Mr. Wonderful and I made our first juice. Last week we watched Fat, Sick and Nearly Dead and wanted to give a juice fast a try before the holidays.
Let me first tell you how liberating making a juice is. The whole process feels good. The noise feels good. The drinking feels good. The murdering of innocent veggies, feels good!! Even the clean up even feels good! I know, I’m on some nutrient dense high or something but seriously. Good.
This first time was basically about figuring out of how to operate the thing which was surprisingly uncomplicated. Choosing the fruit/veg came via whatever was in the fridge so here is our attempt recipe:
Juice ingredients one at a time, greens first. DRINK!
This made about 5- 16 ounce juices which is about a one person juice fast day.

Posted in Breakfast, CSA, Fridge Finds, Juice, Less is more, Make Ahead, Product Review, Vegan, Vegetarian
Tagged breville juicer, detox, fat sick and nearly dead, joe the juicer, juice, juice detox, juice fast
Yesterday I made the tacos that I sometimes dream about in the winter, full of summer veggies practically radiating sunshine, tender-crisp, and juicy. I love tacos, but even I can’t eat them every night for leftovers, so this seemed like the perfect solution: taco soup for the freezer and rest of the week.
Recipe:
Cook all veggies using summer tacos recipe found here spices and all, we will add a little more flavor below due to the dilution from the water. While I was charring all the veggies, I set half of each batch into a soup pot to create taco soup for later in the week.
To that add:
Heat all ingredients through give it a taste and adjust the seasonings (salt for sure). Serve warm with a squeeze of lime, vegan sour cream, and tortilla chips or freeze to preserve the summer.
Posted in CSA, Dinner, Fall Food, Fridge Finds, Leftovers, Less is more, Make Ahead, Meatless Monday, Michigan, Recipes, Seasonal Ingredients, Soup, Vegan, Vegan MoFo, Vegetarian
Tagged tortilla soup, Vegan MoFo, vegan month of food 2013, vegan soup, vegan summer soup, vegan taco soup, vegan tortilla soup
This recipe comes from a dear friend and client The Canning Diva who taught my book group how to make and can everything from garlic to pickles to strawberry jam and salsa this year. Check out one of her canning, preserving or food dehydration classes in west Michigan or book a private party like I did and bring the Diva to you.

Before corn season ends and just as pepper season is starting up, I can’t think of anything better than canning a bunch of corn relish then having it retreat to the shelf waiting for winter- a time when I’m hopelessly longing for summer’s sun.

Homestyle Corn Relish
 In a medium-sized stock pot, combine vinegar, sugar and salt. Bring to a boil over medium heat being sure to stir until all sugar is dissolved. Gradually add corn, peppers, celery and onion being sure to keep everything boiling. Stir often to avoid scorching. Add the spices and stir.
Combine the water and ClearJel, mixing well to create a paste. After making the paste, mix it well into the vegetable mixture while it is boiling. Reduce heat and boil gently for 5 minutes being sure to stir often to avoid scorching.

Ladle hot relish into hot jars being sure to leave ½” head space. Wipe rims with a warm wash cloth dipped in vinegar and secure lids and rings. Hand tighten.
This recipe can be hot water bathed. Place jars in water bather and cover with warm water. Process in a hot water bath for 15 minutes. Remember, timing doesn’t start until water has come to a full rolling boil. After

processing, remove lid and let sit for 5 minutes before removing jars.
Posted in CSA, Make Ahead, Michigan, Product Review, Recipes, Seasonal Ingredients, Vegan, Vegetarian
Tagged canned corn relish, Canning Diva, corn relish recipe, homemade corn relish, preserving, seasonal corn relish, The Canning Diva, vegan canning, vegan corn relish, Vegan MoFo, vegan month of food
Growing up my family didn’t do a tremendous amount of gardening unless it was in the form of flowers, which my mother has always been extremely fond of. The landscaping of our home was meticulous. My grandma however, had a pretty good size garden which was kinda like a neighborhood garden before community gardens were all the rage. She and her neighbors would plant their favorite veggies between the sticky cherry tree and big tire swing, in front of the pine layer separating her home from the IGA, and just beyond the sandbox so that none of us would “go messin’ with it.” The garden made for two things: 1) the most amazing go-cart racing track was formed from its perimeter, and 2) the amount of tomatoes that came from it in August/September was something of the stuff legends are made.
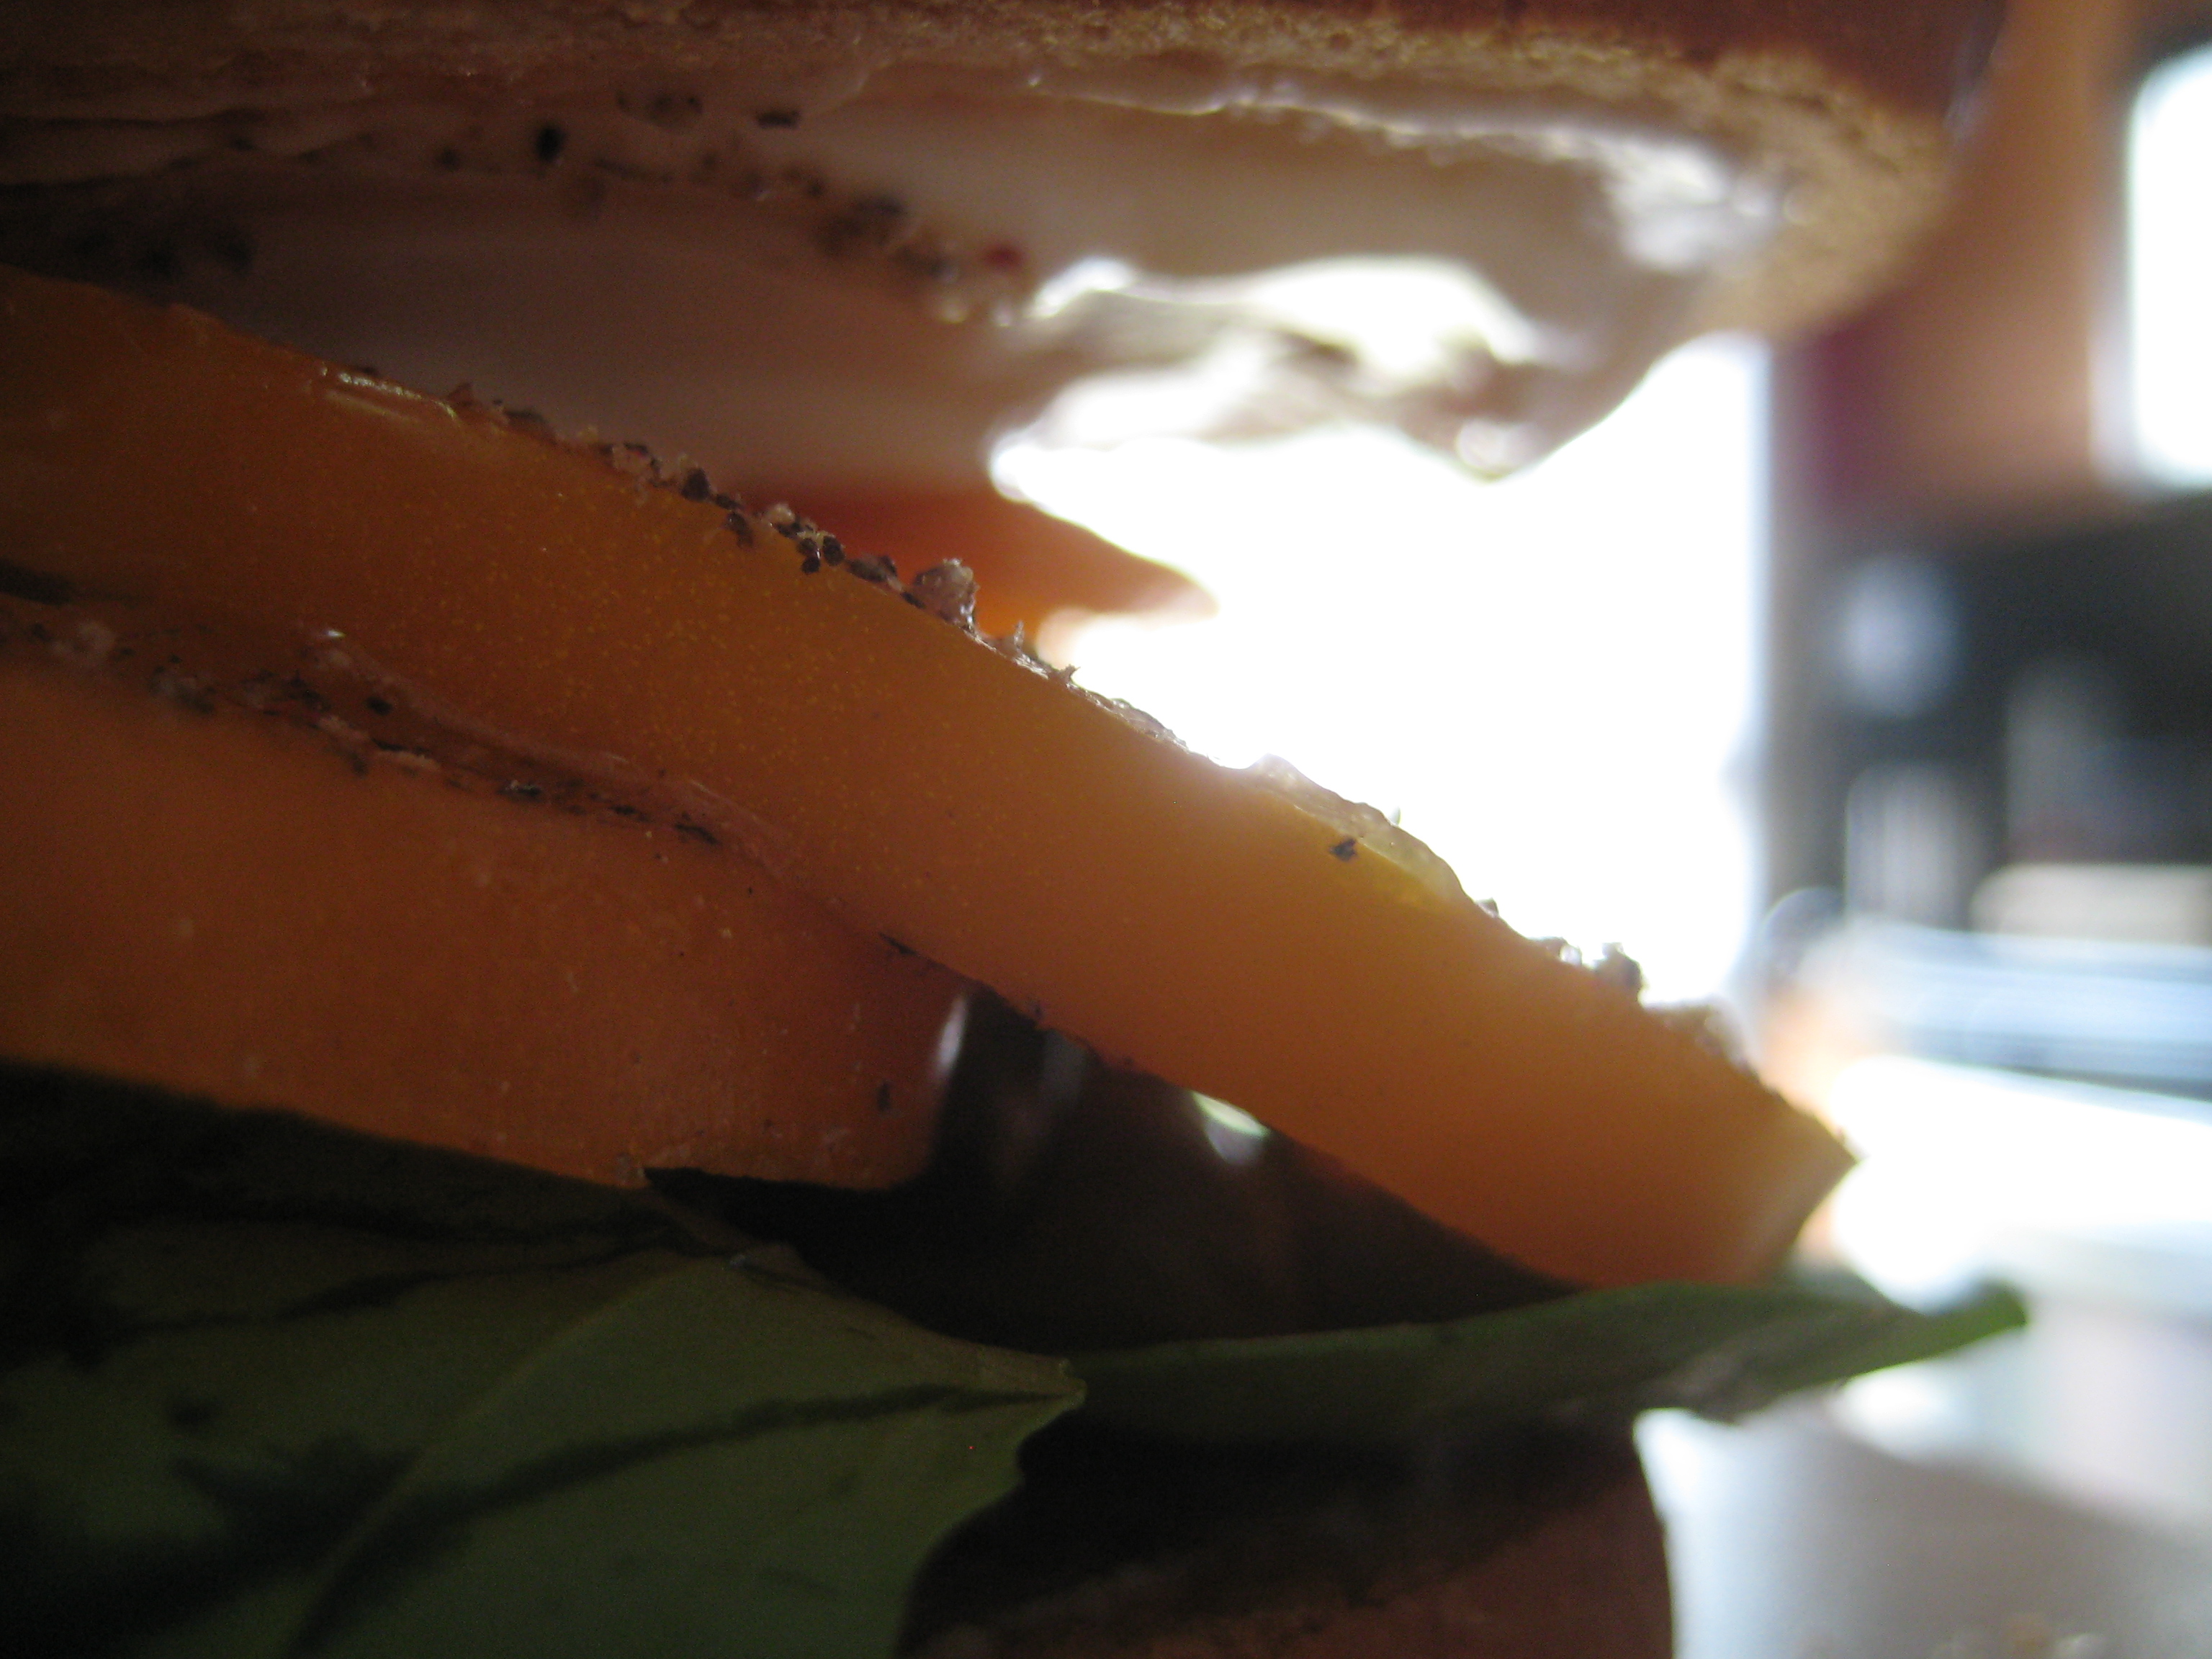
This is the “grown up” vegan version of the tomato sandwich that we would eat nearly every day in the summer at the peak of tomato season which was comprised of gooey Wonder Bread, Miracle Whip, heavy with salt, and layered with iceberg lettuce and fresh, juicy tomatoes. So messy and heavy that you would have to eat the sandwich over the sink or end up changing your shirt after lunch.
Tomato Sandwich

To assemble: spread Vegenaise on bread, layer tomato slices with arugula, smash and enjoy over the kitchen sink.
Posted in Dinner, Fridge Finds, Less is more, Lunch, Meatless Monday, Michigan, Quick Cooking, Recipes, Seasonal Ingredients, Vegan, Vegan MoFo, Vegetarian
Tagged classic vegan sandwich, Michigan seasonal produce, Sandwich, simple vegan sandwich, tomato sandwich, tomato season Michigan, tomatoes, Vegan MoFo, vegan sandwich, Vegenaise
I don’t usually get all political in this blog. Usually it’s a happy place where I tell you about veggies and show you mouthwatering pics of stuff Mr. Wonderful and I eat…but this time, I have to get this out there.
I grew up in a sleepy little village, south west of Ann Arbor, Michigan. It’s a regular village with regular people and it’s home to the regular types of things like a hardware store, a Dairy Queen, pizza joints, antique stores, a fair, a football team, and happens to host a festival annually called The Chicken Broil. I’ve talked about it here a little before, always kinda glazing over the cooking thousands of chicken halves part to bring you radish sammich and coleslaw earlier in this blog’s life. You know the stuff that I don’t get angry about.
It’s kinda a big deal- The Chicken Broil is a summer tradition first organized in the 1950s in which nearly 600 volunteers grill 19,000 pounds of chicken and feed approximately 12,000 guests (SWWCOG). It’s a civic fundraiser that distributes net proceeds to a number of charitable causes in the community. Past funds have gone to public schools, community parks, libraries and other various non-profit groups for items such as playgrounds, high school band uniforms and equipment for local Boy Scout troops (USA Today). It’s a do-gooder thing and very much a part of its midwestern roots. I’m lucky to have benefited in some way from these proceeds growing up I’m sure; however, in growing up and pardon the pun, but in spreading my own wings, I’ve developed a differing attitude to the Chicken Broil in adopting a meat-free lifestyle.
I mention this festival because of the irony that comes when I see in my news feed today that my hometown-home of The Chicken Broil is also home to SASHA Farm Sanctuary one of the most loved farm animal sanctuaries in the midwest that just made national news this week for taking delivery of 100 of the 1,200 hens aero-rescued from a factory hen farm in California-the first time ever that hens were flown across country in a private plane in a rescue effort. They arrived in New York and then were prepped to live out their feathery lives at nine different animal rescues in the US. The 2-yr-old white leghorns are from a battery cage egg farm where they lived in cages so small they couldn’t stretch their wings. When they were 8-days-old, the hens had a portion of their beaks cut off without pain relief to prevent fighting in cages. And you thought your life was difficult!?
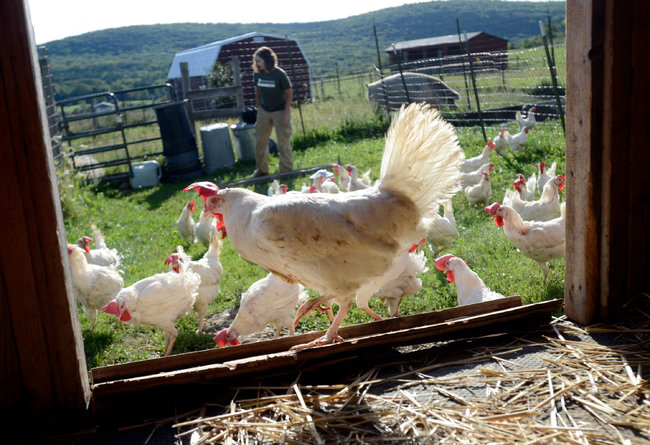
Image: Heather Ainsworth for The New York Times
The remaining 1,850 from the factory farm are available for adoption through Animal Place in California. SASHA Farm will be giving the hens permanent homes. Each bird needs a sponsor to help give them the life they deserve and everything they have been deprived of.
If you were wondering what the fate of the birds would have been without rescue…well, they would have been gassed and tossed like common garbage into the local landfill or ground up and placed in “feed” for other animals, etc as they were “no longer of use” to humans. Now tell me honestly….why are we supporting factory farming and mass consumption of birds and their eggs? To donate to save other farm animals from a landfill as their final resting place, please visit www.sashafarm.org.
Posted in Michigan, Public Policy, Vegan MoFo
Tagged animal welfare, animals, Annual Chicken Broil, cross country hen rescue operation, factory farming, farm animal rescue, food, hen rescue, Manchester Chicken Broil, Rescued Hens, SASHA Animal Sanctuary, The Animal Place, The Animal Place hen rescue, Vegan MoFo
You know you have good friends when they take a veggie gift and your smartass comment about blogging for you and actually do it. So Jon and Kolene over at VeganGR have been the recipient of some ridiculous veggies from my summer surplus…Jon, the resident chef, and Kolene, the photographer came up with Sauerkraut when faced with a do or die cabbage situation a few weeks ago. Here’s what happened, according to Jon:
Faced with an exorbitant amount of cabbage (I mean, A TON of cabbage. See previous post about Adrienne’s gift of 40lbs of veggies), there was only one choice.
Sauerkraut.
Now, let’s be clear about this. I am lazy, and I hate waiting. I also have a mild fear of home fermentation. Recent attempts at rejuvelac based cheese turned into a science experiment into mold than a delicious vegan chèvre. I am determined to plod on, but until I become the king of producing lactic acid, I needed another solution.
A Google search for “quick sauerkraut” turned up far fewer hits than you’d think. This recipe looked promising, so I went with that.
I didn’t have apple cider on hand, ‘cause like, who does? So I doubled the water. To balance and bring in the sugar I think the cider was intended to, I added a little sweetness. The result was really nice, and the hit of a recent summer barbecue!
Ingredients:
Directions:
Posted in BBQ, CSA, Dinner, Fridge Finds, Gluten Free, Less is more, Make Ahead, Meatless Monday, Michigan, Quick Cooking, Recipes, Salad, Seasonal Ingredients, Vegan, Vegetarian
Tagged @VeganGr, Jon Dunn, Kolene Allen, quick fermented kraut, quick foods, quick kraut, quick sauerkraut, quick vegan sauerkraut, sauerkraut, vegan dish to pass, Vegan GR, Vegan Grand Rapids, vegan salad, vegangr.com
I have a small problem: I bite off more than I can chew. This would explain a few things: 1) my 15 lb weight gain in the last two years, 2) my zest for ordering multiple appetizers and never being able to eat an entree at a restaurant, and 3) subscribing to multiple CSA’s in the summertime and then freaking out when it gets to July/August and I have like, triple of everything.
I hate letting good food go to waste so I act as veggie broker to my friends giving them extras of my goods that Mr. Wonderful and I will just watch shrink and die in the confines of our fridge. In the case of eggplants, luckily I can broker all of them off to friends. It’s the only veggie I do not like, well, at least I thought I didn’t until my friends at VeganGR got a hold of my surplus and made eggplant into gravy!
I told Jon Dunn to write a guest post for me and then I could keep my own mouth shut up there, so here’s what he has to say:
There are lots of advantages to being friends with Adrienne and Derek. But the best is that they give us veggies. LOTS of veggies.
Seriously, Adrienne has admitted she’s been overwhelmed with the summer haul from her three (3!!) CSA shares. So, she’s been kind enough to share the wealth. The only requirement was that we blog about what we did with them.
So today, let’s talk eggplant. Adrienne is not a fan, so it was an easy decision to slough them off on us. It’s a good thing, because I can’t get enough of them! I thought I’d share with you a unique recipe I created one time that was kind of an accident.
I had an eggplant, wasn’t sure what I was making for dinner, but threw it in the oven. Then I started making other foods that were ENTIRELY unrelated to an eggplant. So here I was, with a beautiful roasted eggplant and mashed potatoes. So naturally, I made gravy.
Combined with cashews, garlic, and a bit of herbs, the eggplant comes together in a really silky smooth gravy when you blast it in a high power blender. Make sure you fully roast that nightshade. Hopefully for those of you that hate this wonder-veg, that dread of seeing the eggplant in the CSA box will vanish with this recipe!
Ingredients:
Posted in CSA, Dinner, Less is more, Meatless Monday, Michigan, Recipes, Seasonal Ingredients, Vegan
Tagged @VeganGr, comfort food, comfort vegan food, CSA, eggplant gravy, homestyle vegan gravy, Jon Dunn, Kolene Allen, Michigan, roasted eggplant gravy, southern vegan food, summer, surplus eggplant, vegan eggplant recipe, vegan friends, Vegan GR, vegan gravy, vegangr.com, veggies
I’m not a baker. It involves measuring, math, and patience. I’m not good at any of those things. Crisps are perfect for people who care not to measure. They are obviously a rebel dessert. It’s the end of peach season in Michigan and I could not put the siren sound of the white and flame peaches out of my head a second longer and so I bought maybe a few too many which resulted in sharing. I’m so good at sharing!
I give you a recipe for people who hate measuring (for those of you that can’t help yourself, approximate/actual measurements accompany my very scientific ones): Rustic Vegan Peach Crisp
Ingredients:
Directions:
Preheat oven to 375 degrees.
Note: With some crisps there is a bunch of juice associated with the fruit caused by adding lemon juice, or letting it sit for too long before baking. If you hustle you won’t have to add anything to thicken the juice (as there won’t be much to thicken) and you get pure fruit flavor with nothing to get between you and immediate bliss.
Categorizing this under “breakfast” and “dessert” as I did eat it for breakfast this AM-don’t judge me.
Swiss chard is one of those greens I’m not wild about unless it is IN something else or heavily, heavily seasoned. This recipe is modified from Vegan Brunch in the spirit of curried scramble and can be customized with herbs and seasonings in just about any combination. It keeps well and tastes amazing tossed into a pita with arugula and garlic vegenaise for lunch the next day.
Preheat oven to 400 F.
Preheat a large heavy bottomed pan over low-medium heat. Add the oil and the garlic and cook for about 3 minutes, stirring occasionally. What you’re doing here is “blonding” the garlic, it’s ready when it’s turned a light amber color.
Add the chard, oregano, all spices, chives, and and turn the heat up to medium high. Saute for about 5 minutes, until chard is completely wilted/ Add splashes of water if needed to get the chard to cook down. Turn the heat off.
While the chard is cooking, prepare your frittata base. Give the tofu a squeeze over the sink to remove a little of the water. Use your hands to crumble and squeeze it in a large mixing bowl, until it has the consistency of ricotta cheese (about 3 minutes). Add the remaining ingredients to the tofu and mix well. When your chard is ready, incorporate it into the tofu. Be sure to get all of the garlic, but if there is any moisture in the pan try to avoid adding it to the tofu. Taste for salt.
Lightly grease an 8 inch pie plate and firmly press in your frittata mixture. Bake for 20 minutes, until firm lightly browned on top. Let cool for about 3 minutes, then invert onto a plate and serve.
Who can really argue with the taste of a Michigan tomato in July? I can’t. So in taking all the mystery out of this post…some nights you simply eat tomatoes for dinner. Shown below are heirloom varieties Green Zebra and Beefsteak from Good News Farm.
Ingredients:
Slice, cube or dice. Salt and pepper to taste. Noms.
Posted in CSA, Dinner, Less is more, Meatless Monday, Michigan, Product Review, Quick Cooking, Salad, Seasonal Ingredients, Vegan, Vegetarian
Tagged community supported agriculture, CSA, good news farm, goodnewsfarm.org, green zebra tomatoes, heirloom tomatoes, michigan produce, seasonal produce, simple dinner
So you went crazy this past weekend and picked a zillion berries and now you are worried that your fresh strawberries might not be so fresh by the time you want to use them? Here’s a little trick from The Canning Diva to buy you a little bit of time while you process those berries:
Now get to work using the fruit of your labor in this unusual dish sure to delight at your next porch party or holiday party. In the dead of winter, if you pull out a jar of this to take for a dish to pass, you will look like a rock star. This past weekend, my friend Jen, her mom, Mrs. Jen and I went to work churning out two batches of this sweet and savory salsa. I can’t wait to try it over some vegan cream cheese on a cracker or a corn chip.
The Diva’s Signature Strawberry Salsa
Using a slotted spoon, hot pack salsa into pint size jars being sure to include ample liquid in each jar so long as the salsa isn’t too watery. Leave a ½” of headspace for proper processing. (I filled 7 jars with salsa and had 1 pint left over that was pure liquid. Process the liquid the same as the salsa and use it as a marinade or the base of a sweet and savory cocktail)
Posted in CSA, Fall Food, Less is more, Make Ahead, Michigan, Recipes, Seasonal Ingredients, Vegan, Vegetarian
Tagged canning, Comstock Park, grand rapids, Krupp Farm, Michigan, michigan produce, Michigan strawberries, preservation, strawberry salsa, tangy, The Canning Diva, The Diva's Signature Strawberry Salsa
My friend Jen had to sell me on this idea big time as every other time I have had or used chia seeds except in a granola bar, I have come away feeling icky with bloating, and all those black seeds sticking in my teeth, gelling and [in my imagination] growing [cha, cha, cha chia]. This however, seems like an appropriate place for chia seeds-in freezer jam.
This recipe was adapted from Oh She Glows and came together in a blender, in a blink. Since this is freezer jam, pop it into a freezer safe container AFTER you let it sit for a few hours and be sure to leave plenty of headspace for the chia to work it’s magic.
Ingredients
Wash, hull, blend strawberries together, stir in syrup, chia, zest, juice and 6 of the T of water. Depending on the consistency you want from the jam, add up to 6 T more water. We added all 6 as our chia were already thickening past the point we really liked it while it was sitting waiting for us to scoop it into the jars.
Ladle into freezer safe jars, allow to sit 6-8 hours before putting in the freezer to gain perfect chia thickness. Store in freezer up to 6 months. The Mountain Mama Cooks adds vanilla to hers if you would like for a more “cooked” versus raw taste. If you are a purist, Eating Bird Food always has strong chia recipes even for the chia-shy like me.
This recipe tasted like a fresh picked strawberry with a kick. I will need that come winter.
Posted in Fridge Finds, Less is more, Make Ahead, Meatless Monday, Michigan, Quick Cooking, Recipes, Seasonal Ingredients, Vegan
Tagged chia jam, Eating Bird Food, michigan strawberry freezer jam, Oh, She Glows, strawberry chia freezer jam, strawberry chia jam, strawberry freezer jam, strawberry jam, The Mountain Mama Cooks, vegan chia jam, vegan jam
I love veggies. I mean it would be tough to be veganish and not adore vegetables (let’s just pretend that eggplant is a toxin because save eggplant, I love all veggies-I hate, no loathe, eggplant); but veggies pickled? Well that has to be about as close to bliss as one can get eating summer food straight from a jar in the off season (if mine last that long).
My day job is as project director at a public relations firm, this past winter we retained a client called The Canning Diva. She came to our first meeting with a jar of salsa and even if she walked out the door as a client tomorrow, I would remain close friends with her. She’s “good people” as my friend Josh Hiller would say. I’ve drank the Kool Aid. I now measure and use ratios in the kitchen. The Canning Diva makes canning accessible and dare I say fun. She teaches preservation methods to all from novices to seasoned veterans and everyone in between, her enthusiasm for the art of canning is frankly unmatched. I mean she is TRULY excited about preserving food as art.
About a month ago, I invited The Canning Diva to my book group (we stopped reading books like years ago) and we created all sorts of delish cocktail delights like pickled Brussels sprouts, carrots, and asparagus; a session from which all members left feeling confident, inspired, and maybe a little drunk…we had to TRY the cocktail pickles The Canning Diva brought that showed us our finished product- I mean it was absolutely necessary we know what we were getting ourselves into, right? Sidebar: do not even get my friend Julie talking about the dry wine pickled garlic cloves…she might be having a love affair with them. They are exceptional.
I held off experimenting with pickling until Michigan asparagus came into season at my fave local farm, Krupp Farms, whereupon my gal pal Jen, her mom, Mrs. Jen, and I decided to take a cloudy summer Saturday and turn in into a canning extravaganza! We canned over 140 jars of delish summer surprises in one very full day.
While my goodies sit on a shelf, waiting to “cure”, I leave you with one of my favorite things to come out of a jar since peanut butter…The Canning Diva’s Pickled Asparagus recipe. I’ll share the strawberry recipes we worked on soon too.
The Canning Diva says: a great side to a frothy beer or an excellent alternative to celery in a Bloody Mary! If you would prefer a non-alcoholic splendor, they taste excellent in a salad or an addition to a relish tray.
Ingredients
As usual, prepare all of your jars ahead of time and have your lids and rings setting in boiled water. If you don’t know how to do this…please, get with Diane, AKA The Canning Diva at one of her Canning 101 classes offered in GR. It will open a whole new world to you for food preserving and SAVING MONEY by preserving the summer harvest.
In a large stainless steel stock pot, combine vinegar, water and salt. Stir well and bring to a boil, stirring to dissolve the salt. Place a garlic clove, ½ tsp dill seeds, ½ tsp of hot pepper flakes and ½ tsp mustard seeds in each jar. Raw pack the asparagus into each jar leaving a generous ½” head space.
Ladle hot liquid into jars being sure to maintain the ½” headspace. Remove any air bubbles using your canning utensil or the handle of a wooden spoon. Adjust headspace if necessary.
Tip: If you run out of pickling liquid, use half the parts listed above, boil and fill jars accordingly. Never fill your remaining jars with just water – it will lessen the acidic level and cause food to spoil.
Using a warm wash cloth dipped in vinegar, wipe each rim and screw bands. Place lids and rings on each jar and hand tighten. Place jars in water bather and cover with water. Process the jars for 10 minutes. Remember, processing time doesn’t begin until the water is at a full rolling boil.
We canned 10 lbs of asparagus in varying sized jars from pint to half pint, so we doubled this recipe AND then needed an additional recipe of JUST pickling brine so we whipped up 3 brine recipes in all. Super simple to fix a brine error if it happens is what I’m getting at.
Full disclosure: The Canning Diva is one of my clients, I paid for a class as did a bunch of my gal pals about a month ago, then we were unleashed into the world of canning. I wrote this blog to share this info, a divine recipe, and help bring awareness to this craft during the Midwestern summer bounty, not necessarily to promote her business; however, if that also happens…AWESOME because this is a skill I should have learned a long time ago. Thanks Canning Diva!
Posted in CSA, Less is more, Make Ahead, Meatless Monday, Michigan, Seasonal Ingredients, Vegan, Vegetarian
Tagged canning, cocktail asparagus, cocktail pickles, Doomsday Preppers, dry wine, food preservation, garlic cloves, krupp farms, on the shelf, pickled asparagus, pickled garlic, pickles, preppers, shelf stable asparagus, The Canning Diva
A recipe doesn’t have to be very complex. Sometimes I just grab stuff that is either: 1) about to go bad in my fridge, 2) really fresh in my fridge, or 3) stuff that sounds good and hope it all tastes good together. This was #3 for a quick dinner and several more lunches.
Not rocket science, hell sometimes I don’t even measure…
Ingredients:
Dressing :
Tossed the dressing with the wheat berries and severed over microgreens. Tasted amazing the next day in a pita.

A Thanksgiving miracle…two blog posts in one week. I dare you not to put this on everything at your Thanksgiving meal.
Pretty great dressing or dip. Pretty good FOR you too.
Enjoy.
In a food processor or blender, blend the following until pureed:
I served mine over just about everything from quinoa and chickpea bowls, to brussels sprouts to a salad of roasted squash, onions, apples and pears (shown). Try it out at Thanksgiving dinner.

Courtesy of Jen & Company, a food and fitness blog.
Tree Huggers is one of those happy places. So. Much. Happy. I basically stalked the owner and demanded that she be my friend. Hey, whatever works. Angela Topp is a lover of vegan eats, IPA and dogs, she’s lovely and skilled at creating partnerships in the Earth-friendly community. This recipe share is the result of Tree Huggers partnership with Bartertown Diner. Once a week (in the evening) a chef from Bartertown works at Tree Huggers prepping recipes straight from ingredients available from the cooler (yes, RIGHT IN THE STORE) and then shares a tasty animal-free dish with you. You can walk out with everything you need to make it from the help of the Bartertown chef as your personal shopper. How cool is that?!
Enjoy a burger on the grill that didn’t come from a the screaming death of a helpless animal. Yeah, I just said that.
Black Bean Barley Burger
1. Cook barley, set aside and allow to cool to a handleable temperature.
2. Cook black beans until soft, mash using a fork or food processor, set aside.
3. Finely chop onions and garlic, Sautée until translucent.
4. Combine all ingredients in a large mixing bowl, mix well.
5. Preheat your oven to 350
6. Form mixture into sizable patties on a greased baking pan.
7. Bake for 30 minutes, flipping once halfway through.
8. Allow patties to cool, this helps with binding.
9. Now you have patties for dinner and leftovers for the week!
Feel free to experiment with your own blend on spices.

Posted in BBQ, CSA, Dinner, Fall Food, Quick Cooking, Recipes, Vegan
Tagged Barley Burger, Bartertown, Bartertown Cafe, Tree Huggers, TreeHuggers
Last week’s vegan (cheeseless) pesto recipe gets a workout here on a hodge-podge salad from seasonal veggies. A “clean out the fridge” recipe that turned out pretty delish. This could easily be made vegan or gluten free with the appropriate pasta.

Posted in Baking, Bread, Breakfast, Brunch, CSA, Dessert, Recipes, Seasonal Ingredients, Vegan, Vegetarian
Tagged blueberry baking, blueberry vegan baking, Pinner, Pinning, Pinterest, quick bread, vegan, vegan baking, vegan blueberry lemon loaf, vegan blueberry yogurt loaf, vegan lemon blueberry loaf, veganish, vegetarian, yeast free sweet bread
What to do with a bazillion tomatoes, some fresh basil and a hungry husband? Make dinner. My first thought was bruschetta! Then I thought about the naked pasta in the fridge so I warmed up the noodles in some hot water, you know the way Olive Garden does it (start rant-no, they don’t make their own food in the restaurant. I know I just broke your heart. It comes to them from some industrial kitchen, off a truck, in large Ziplocks they toss in hot water, warm up then put on a nice plate. You are so distracted by “neverending salad and sticks” that you don’t notice the food is gross and reheated-end rant). I served this sauce over top, not to make a statement, but mostly because I was too lazy to put this sauce on simmer at like noon, so what’s the point to heat it up at 7pm? No point. I give you raw tomato sauce.
Posted in CSA, Dinner, Fridge Finds, Less is more, Meatless Monday, Michigan, Quick Cooking, Recipes, Vegan, Vegetarian
Tagged raw pasta sauce, raw tomato sauce, spaghetti, spaghetti salad
I’ve been asked for this recipe at least a dozen times in the last few days. Here is a re-post of Pepper Jelly.
Turns out, I can grow jalapenos. Lots of them in fact. I picked most of them today, grabbed a few red bell peppers from the Fulton Street Farmer’s Market, gloved up, and started chopping. I make a few batches of this so that I can gorge myself in the summer, and then later I get serious about storing 6-8 jars for holiday gift giving, and/or unexpected guests fa-la-la-la-la-ling up at my house and me with nothing to serve. This makes a great show off appetizer in the dead of winter with a cream cheese base, served over a cracker. Summer on a wheat thin. Plus, you look all Betty Crocker-like for having something preserved (ohhhhh, ahhhhh) on hand. It’s a win-win. I modified this recipe from my friend Lins Ray’s recipe.
Pepper Jelly
Chop all peppers into a really, really small dice removing seeds and most of the white vein inside the peppers. Wear two sets of latex gloves for this task, you will thank me later. Combine the lemon juice, peppers, vinegar and sugar in a large pot and boil for 15 minutes stirring occasionally, keep an eye on this as it will start to boil, then boil over like spaghetti does without any warning, then you are dunzo. Add liquid pectin, boil 3-5 minutes more. Remove from heat and allow to cool slightly. Spoon into jars or plastic containers, do not fill to top. When this freezes like all other liquids it expands. Full to the brim means a crack and loss of your precious jelly. Store in freezer for up to 6 months, if it lasts that long. DO NOT ATTEMPT TO MULTIPLY OR DIVIDE THE RECIPE. For whatever reason, when you make jam, doubling or dividing the recipe results in utter failure. Period.
To serve, pour thawed jelly over a log of cream cheese for a treat on crackers. I have also, in a bind poured this over tofu “meatballs” in a crockpot and served as an appetizer. The possibilities are endless. Taste it and you will come up with some of your own. Then come back here and post them for the rest of the Interwebs.
Posted in CSA, Recipes, Seasonal Ingredients, Uncategorized, Vegan, Vegetarian
Tagged c cider vinegar, fruit pectin, red bell peppers, vegetarian
