
Forget about Daylight Savings Time. The Happy Herbivore, Lindsay Nixon, fellow chickpea lover, has found a way to give you back a few hours of your week. Previously, I would spend a few hours a week, typically either on a Sunday as a diligent planner, or via freaking out when I get home from work worrying about what will go on the grocery list, or what I will cook for dinner, etc. The Happy Herbivore has eliminated the planning, digging, guessing, grocery list making, contemplating out of my weekly food equation with 7-Day meal Plans.
With this service, which is around $20.00 a month, I get a pdf link weekly with a calendar for meals, all the recipes in one place, a premade grocery list, calorie counts for all food consumed, and suggested snack ideas. Each day falls into the 1,200 calorie range so you can add snacks or decrease snacks as needed and the meals are interchangable with other weeks and other meals. She does a pretty good job of recycling ingredients through the week in different ways so you don’t feel like you are always eating say quinoa in the same way. Today for example, we ate quinoa for breakfast in chocolate *pudding* form with blueberries. Even I was skeptical, and I spend most of my waking life thinking about what I am going to next eat. Turns out, taking the thinking portion out of food is what I need during this part of life. I sometimes don’t want to make another decision that day which typically translates into take-out which is not good for my weight OR my checking account.
The Happy Herbivore has cookbooks too of course, so you could pull out a recipe and swap it for another if you so choose. At any rate. I’d be happy to share a week with you if you are scared of the initial investment-just leave me a comment including your email address below and I’ll send it out to you. Just one per person though, I want this service to continue and for that to happen, Lindsay has to be compensated for her time. I’m sure you will find, it’s worth all $18.88 per month to regain a few extra hours a week and a plan after you try.
-

- I mixed the maple and cocoa together before I dumped it into the quinoa.
-

- Blueberries and extra maple for Mr. Wonderful
-
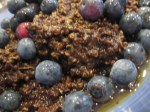
- Quinoa takes on a pudding like consistency.
-

- The texture took a second to catch on in our house. But the taste helped us get over that fast.
Curious what Chocolate Espresso Quinoa Pudding is? Try it.
- 1/4 C quinoa (rinsed)
- 3/4 C unsweetened chocolate almond milk
- 1 1/2 T pure maple syrup
- 1 T unsweetened cocoa powder (I mixed 1/2 special dark and 1/2 regular)
- 1/8 tsp espresso powder
- 1/8 tsp vanilla extract
- 1/2 C blueberries (fresh or frozen)
In a saucepan, combine quinoa, chocolate milk and espresso. Cover, bring to a boil, reduce to low and simmer until quinoa is cooked and fluffy, about 15-20 minutes. Stir in maple syrup, vanilla, and cocoa [I made a quick paste of this before putting into quinoa], plus another splash of chocolate milk. Taste, add more maple syrup if you need it a little sweeter. Top with fresh fruit. Serve warm.

